Ever wondered why your Starlink internet keeps dropping out at the worst possible moments? I’ve been there too, and let me tell you – proper Starlink dish placement is the key to solving these frustrating issues.
Getting the most out of your Starlink satellite internet isn’t just about signing up for the service and hoping for the best. I’ve learned through experience (and a fair bit of trial and error) that the single most important factor affecting your Starlink performance is where you place that dish.
In this comprehensive guide, I’ll walk you through everything you need to know about finding the perfect spot for your Starlink dish – from understanding the basics to tackling advanced installation scenarios. Whether you’re just unboxing your Starlink kit or looking to upgrade your current setup, this is the guide the official manual should have included.
- Understanding How Starlink Satellite Internet Works (And Why Placement Matters)
- Use the Starlink App: Your Essential Placement Tool
- Scouting Your Property: Finding the Perfect Spot for Your Starlink Dish
- 🛰️ Starlink Mount Options Comparison Tool
- Choosing the Right Mount: Options, Pros, Cons, and Best Use Cases
- Installation Best Practices Directly Related to Placement
- Post-Installation: Fine-Tuning & Performance Checks
- Common Placement Pitfalls & Troubleshooting
- Advanced & Specific Scenarios
- Essential Tools & Accessories for Optimal Starlink Dish Placement
- Conclusion: The Foundation of a Great Starlink Experience
Understanding How Starlink Satellite Internet Works (And Why Placement Matters)
Let’s start with the basics. Starlink isn’t like traditional satellite internet services you might be familiar with.
Starlink operates using thousands of satellites in low Earth orbit that are constantly moving overhead. Your Starlink dish needs to maintain a continuous connection with these satellites as they zoom across the sky.
Here’s why this matters for dish placement:
- Unlike satellite TV where your dish points at one fixed satellite, your Starlink dish needs a wide, unobstructed view of the sky to track multiple satellites seamlessly
- Even small obstructions can cause momentary disconnections as satellites pass behind them
- These brief interruptions might be barely noticeable when browsing websites, but they’ll ruin your Zoom calls and online gaming sessions
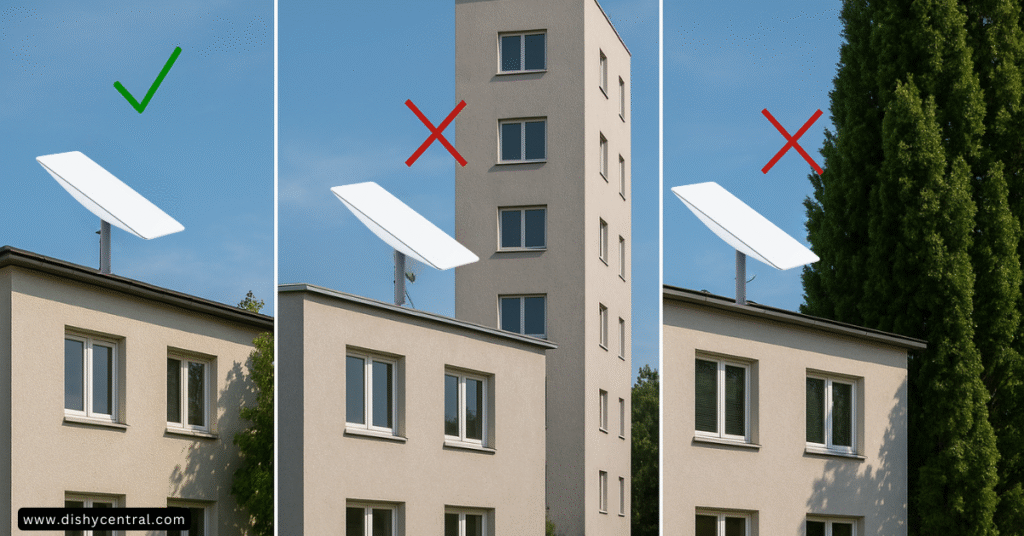
The #1 Enemy of Your Starlink Experience: Obstructions
When I talk about obstructions, I’m referring to anything that blocks your dish’s view of the sky. This includes:
- Trees (even bare branches in winter can cause issues!)
- Buildings and structures
- Roof overhangs
- Hills and mountains
- Chimneys and vents
What makes this tricky is that the Starlink dish needs a surprisingly wide field of view. Many new users install their dish with what looks like “plenty of clear sky” only to face frustrating connection issues because they didn’t account for the full cone of visibility the system requires.
The impact of obstructions isn’t just occasional dropouts. They can also lead to:
- Reduced download and upload speeds
- Higher latency (ping)
- More frequent disconnections
- Poorer overall performance
And don’t forget seasonal changes! A location that works perfectly in winter might become problematic when trees leaf out in spring. Similarly, young trees that seem harmless now could grow into major obstructions in a few years.

Use the Starlink App: Your Essential Placement Tool
Before you drill a single hole or climb any ladder, download the Starlink app. This free tool is absolutely essential for finding the optimal install location for your Starlink dish.
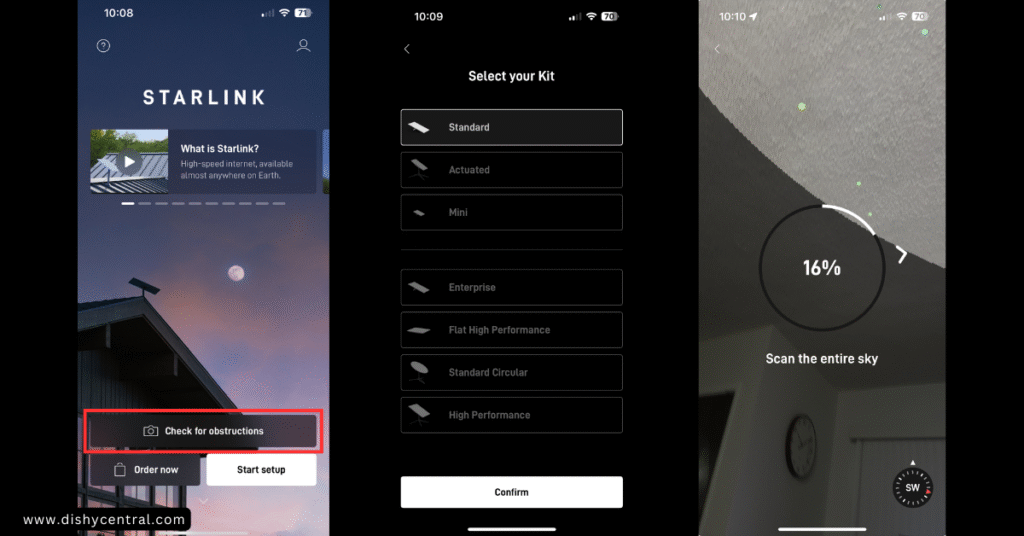
The app includes an “obstruction finder” feature that uses your phone’s camera to scan the sky and show you exactly where obstructions might impact your service. Here’s how to use it:
- Download the Starlink app from your app store
- Open the app and tap “Check for Obstructions.”
- Follow the on-screen instructions to scan your potential installation site
- Review the results carefully
The app will generate a visualization showing areas that are:
- Clear: Ideal for satellite connection
- Potential Obstructions: May cause occasional issues
- Obstructed: Will definitely cause connection problems
Here’s a pro tip I learned the hard way: Don’t just scan from one spot. Try several potential locations and compare the results. Also, scan at different times of day if possible, as the sun’s position can sometimes affect the app’s ability to detect certain obstructions.
While the Starlink app is incredibly helpful, it does have some limitations. It might miss very thin branches or underestimate future growth. Always use your common sense along with the app’s guidance.

Scouting Your Property: Finding the Perfect Spot for Your Starlink Dish
Now that you understand the importance of a clear sky view and have the app ready to go, it’s time to scout your property for potential installation spots.
Start with a walkabout of your property, looking for areas with good sky visibility. Common locations include:
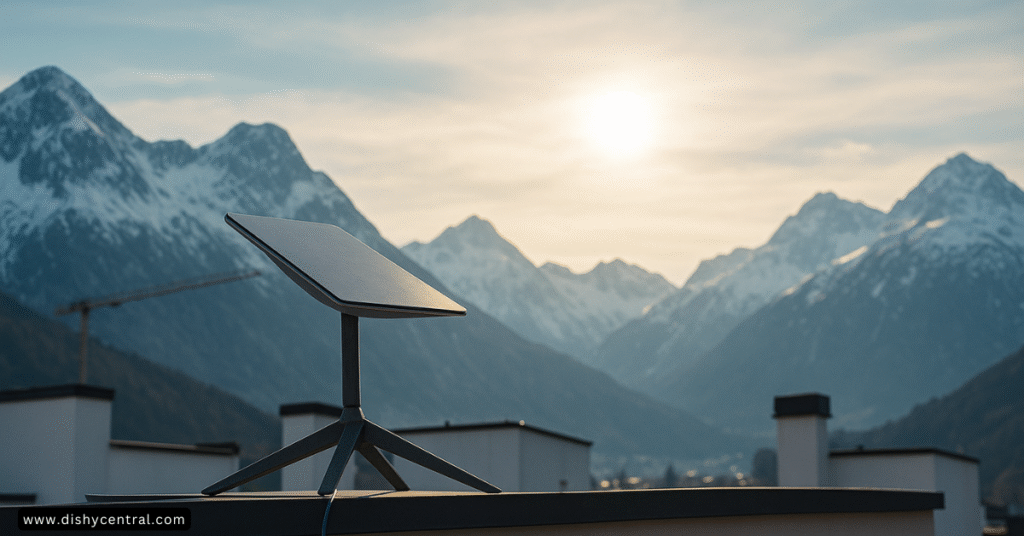
- Roof mounts (often provide the best elevation)
- Ground-level locations away from trees and buildings
- Poles or elevated structures
But clear sky view isn’t the only factor to consider. Here are other crucial considerations:
Cable Run Considerations
The standard Starlink cable has a maximum length, and while extensions are available, each connection point can introduce potential issues. Consider:
- How far the dish will be from where your router will be located
- The path the cable will need to take
- How to protect the cable from damage (lawn mowers, foot traffic, etc.)
Power Access
Your Starlink dish needs power, so consider:
- Proximity to power outlets
- Whether outdoor-rated extensions might be needed
- Power consumption and circuit capacity
Accessibility Factors
Think about not just installation, but future maintenance:
- How will you access the dish for cleaning or adjustments?
- In snowy climates, how will you clear snow if needed?
- Can you safely reach the location for installation?
Aesthetic and Regulatory Considerations
- Do you have HOA restrictions on visible satellite equipment?
- Will the placement be visually acceptable to you and your neighbors?
- Are there any local regulations about antenna installation?
Safety First
- Always avoid power lines when selecting a location
- Ensure the mounting surface is stable and can support the weight
- Consider wind loads and weather exposure
Temporary Setup Test: One strategy I highly recommend is setting up your Starlink dish temporarily in your intended location before permanent mounting. The dish will work sitting on its included base on a flat surface. Let it run for 24-48 hours and monitor the obstruction stats in the app. This can save you from permanently mounting in a problematic location.
🛰️ Starlink Mount Options Comparison Tool
Compare different mounting options to find the perfect solution for your Starlink dish
Roof Mount
Highest elevation with optimal sky view
Ground Mount
Easy access and simple installation
Wall Mount
No roof penetration, good positioning
Pole Mount
Maximum height to clear obstructions
🏠 Roof Mount Details
✅ Advantages
- Highest point provides best sky view
- Shorter cable runs to interior
- Protected from ground-level hazards
- Professional, clean appearance
- Usually clears most nearby obstructions
❌ Disadvantages
- Difficult and dangerous maintenance access
- Roof penetration creates leak risks
- Snow accumulation may require clearing
- More complex installation process
- Weather exposure can be extreme
🌱 Ground Mount Details
✅ Advantages
- Easy maintenance and cleaning access
- No roof penetration required
- Simple DIY installation possible
- Most cost-effective option
- Easy to relocate if needed
❌ Disadvantages
- More susceptible to obstructions
- Risk of damage from lawn equipment
- Potentially longer cable runs
- Lower elevation limits sky view
- May be affected by snow accumulation
🧱 Wall Mount Details
✅ Advantages
- Avoids roof penetration completely
- Can position to clear eaves and overhangs
- Generally easier access than roof mounts
- Uses solid wall structure for stability
- Good compromise between height and access
❌ Disadvantages
- Sky view may be limited by roofline
- Requires finding solid wall studs or masonry
- May not provide enough height for obstacles
- Aesthetic impact on home exterior
- Limited positioning flexibility
📡 Pole Mount Details
✅ Advantages
- Maximum height to clear obstructions
- Excellent for properties with many trees
- Highly customizable positioning
- Can be placed anywhere on property
- Future-proof against growing obstacles
❌ Disadvantages
- Wind stability becomes critical concern
- Complex grounding requirements
- Most visually prominent option
- Higher material and installation costs
- May require permits in some areas
Choosing the Right Mount: Options, Pros, Cons, and Best Use Cases
The mount you choose can dramatically affect your Starlink installation's success. The best mount for your situation depends on your specific property and needs.
Ground Mount Options
Included Base / Pole Mount in Ground
Pros:
- Easy access for maintenance
- No roof penetration
- Simple installation
Cons:
- Often more susceptible to obstructions due to lower height
- Potential for damage (lawn mowers, animals, etc.)
- Cable routing can be challenging
Best For: Properties with very open areas and minimal obstructions, temporary setups, or testing locations
Pro Tip: When using a ground pole, ensure it's properly secured. For permanent installations, consider setting the pole in concrete at the appropriate depth for your soil conditions and local weather patterns.
Roof Mount Options
Pitched Roof Mount, Flashing Mount, Non-Penetrating Ridge Mount
Pros:
- Usually provides the highest point for best sky view
- Often results in shorter cable runs
- Less susceptible to ground-level hazards
Cons:
- More difficult to access for maintenance
- Roof penetration can lead to leaks if not properly sealed
- Snow accumulation might require clearing in some climates
Best For: Most residential installations, especially when lower-level obstructions are present
Pro Tip: Proper sealing and flashing are absolutely critical when penetrating your roof. Always use appropriate materials for your specific roof type, and consider non-penetrating options when suitable for your roof design.
Wall Mount Options
Short & Long Wall Mounts
Pros:
- Avoids roof penetration
- Can position the dish to clear eaves and overhangs
- Generally easier access than roof mounts
Cons:
- View might still be limited by roofline
- Requires a solid wall structure for mounting
- May not provide enough height to clear nearby obstacles
Best For: Gable ends of houses, upper walls below rooflines with good sky exposure
Pro Tip: Always mount into studs or solid masonry, never just into siding or drywall. Use a stud finder and appropriate anchors for your wall construction.
Pole Mount Options
Attached to Eave/Fascia, Chimney, or Standalone Tall Pole
Pros:
- Can achieve significant height to clear obstructions
- Highly customizable positioning
- Works well for properties with many trees
Cons:
- Stability concerns in high winds
- More complex grounding requirements
- May be visually prominent
Best For: Properties with significant obstructions that need height to clear
Pro Tip: With taller poles, stability becomes crucial. Consider using guy wires for additional support in windy areas, and always account for the increased wind load on taller structures.
Specialty Mounts
RV/Mobile, Non-Penetrating Flat Roof
The flat high performance dish offers specific advantages for mobile users, with a lower profile design that's easier to store when traveling. For commercial buildings with flat roofs, non-penetrating mounts using ballast (weight) can provide secure mounting without compromising the roof membrane.
Installation Best Practices Directly Related to Placement
Once you've selected your location and mount type, proper installation is critical for long-term success.
Securing the Mount Properly
Stability is absolutely paramount with satellite systems like Starlink. The dish must remain perfectly still to maintain optimal connection.
- Use appropriate hardware for your mounting surface
- Check for level and plumb installation
- Follow torque specifications if provided
- Consider additional bracing in high-wind areas
Cable Routing & Management Best Practices
Poor cable management is one of the most common causes of preventable Starlink issues. Follow these guidelines:
- Plan your entire cable path before drilling any holes
- Use drip loops before entry points to prevent water infiltration
- Secure the cable with appropriate clips, conduit, or covers
- Avoid sharp bends or kinks that can damage the cable
- Properly seal all wall or roof penetrations with appropriate weatherproofing
This is critical: Water damage from improperly sealed cable entry points can cause thousands in home repairs. Use high-quality silicone sealant or weatherproof cable glands designed for this purpose.
Grounding & Lightning Protection
This is often overlooked but incredibly important for equipment safety and potentially home safety:
- Properly ground metal mounts and poles according to local electrical code
- Consider using Ethernet surge protectors at both ends of the cable run
- For tall mounts, lightning protection may be advisable
Disclaimer: Electrical safety requirements vary by location. Consult your local building codes and potentially a professional electrician for proper grounding techniques.
Initial Power-Up & Orientation
When you first power up your Starlink dish, it will automatically orient itself to find the optimal position. Ensure it has adequate space to move freely during this process, and be patient as it may take several minutes to complete its initial setup.
Post-Installation: Fine-Tuning & Performance Checks
After installation, monitoring is key to ensuring you've found the optimal placement.
Monitoring Stats via the Starlink App
The Starlink app provides valuable insights into your system's performance:
- Check for reported obstructions (allow 12-24 hours for the map to fully populate)
- Monitor uptime, latency, and speeds
- Review connection statistics regularly
Understanding Performance Metrics Related to Placement
Different patterns of issues can help diagnose placement problems:
- Frequent small outages (under 2 seconds): Often indicates minor edge obstructions
- Longer outages (over 2 seconds): Suggests significant obstructions
- High latency variability: Can indicate the system is struggling to recover from obstruction events
Making Micro-Adjustments If Necessary
While the Starlink dish automatically orients itself, if your stats show persistent edge obstructions, small repositioning might help. Sometimes moving just a few feet along a roof ridge can make a significant difference in performance.
Common Placement Pitfalls & Troubleshooting
Even experienced installers can encounter challenges. Here are some common pitfalls and solutions:
Underestimating Tree Growth or Seasonal Changes
Problem: Trees that seem harmless now grow or leaf out, causing issues.
Solution: Plan for future growth and re-evaluate seasonally. When in doubt, give trees an extra wide berth.
Ignoring Small Obstructions
Problem: Minor obstructions seem insignificant but cause real issues.
Solution: Aim for 100% clear sky via the app. Even small obstructions can impact real-time applications like video calls and gaming.
Poor Mount Stability
Problem: Wind causes dish movement, disrupting signal.
Solution: Reinforce mounts, check fittings regularly, and consider guy wires for poles.
Improper Cable Routing/Damage
Problem: Cable damage from exposure, animals, or lawn equipment.
Solution: Inspect cables regularly, use conduit where exposed, and secure properly.
Insufficient Weatherproofing
Problem: Water intrusion at entry points.
Solution: Re-seal penetrations properly with appropriate materials.
Advanced & Specific Scenarios
Extreme Weather Considerations
Heavy Snow
- Mount high enough to avoid burying
- Remember that the Starlink dish has a self-heating feature, but it has limits
- Consider access for manual clearing when necessary
High Winds
- Mount stability becomes even more critical
- Consider the aerodynamic profile of your dish location
- Use additional securing methods where appropriate
Coastal/Salty Air
- Corrosion can be accelerated in these environments
- Consider mount material carefully (stainless steel options where available)
- Implement regular inspection schedules
| Related: Does Starlink Work in Bad Weather? What You Need to Know
RV & Mobile Placement Considerations
If you're using Starlink for RV or mobile applications, some special considerations apply:
- The importance of finding a clear view at each new location
- Temporary mounting stability options
- Stowing considerations for travel
- Advantages of the flat high performance dish for mobile users
Dealing with HOAs or Restrictions
Some neighborhoods have restrictions on visible satellite equipment. Creative solutions include:
- Disguised poles (some can look like trees or landscape features)
- Strategic garden placement
- Understanding FCC OTARD rules that may override some HOA restrictions
- Seeking proper permissions where required
Essential Tools & Accessories for Optimal Starlink Dish Placement
Having the right tools makes installation much easier and safer:
Must-Have Tools
- Starlink app (absolutely essential)
- Appropriate ladder(s) for your installation height
- Drill and various bits (for different mounting surfaces)
- Level
- Stud finder (for wall mounts)
- Measuring tape
- Wrenches/socket set for mount hardware
- Quality exterior silicone sealant or appropriate roof sealant
- Cable management supplies (clips, zip ties, conduit)
Recommended Additional Items
- Grounding wire and clamps
- Ethernet surge protectors
- Fish tape (for running cables through walls)
- Safety equipment (harness for roof work, etc.)
- Specific third-party mounts for your unique situation
Conclusion: The Foundation of a Great Starlink Experience
I can't emphasize enough how crucial proper dish placement is to your overall Starlink experience. The extra time spent finding the optimal location and installing correctly will pay dividends in reliable, high-speed internet service for years to come.
Remember these key takeaways:
- Prioritize 100% clear sky view above almost everything else, verified by the Starlink app
- Consider the full range of factors: obstructions, cable run, power access, accessibility, aesthetics, and safety
- Choose the right mount for your specific situation
- Follow best practices for installation, especially cable management and weatherproofing
- Monitor performance after installation and be willing to make adjustments
With careful starlink dish placement following the guidelines in this article, your Starlink satellite internet system can truly be the game-changer it's designed to be, delivering reliable high-speed internet even in the most remote locations.
Have you installed your Starlink dish? I'd love to hear about your experience in the comments below! Share your own placement tips or challenges you've overcome.
Want more information? Visit the Starlink Help Center for official guidance or check out the Starlink Shop for additional mounting accessories.


