
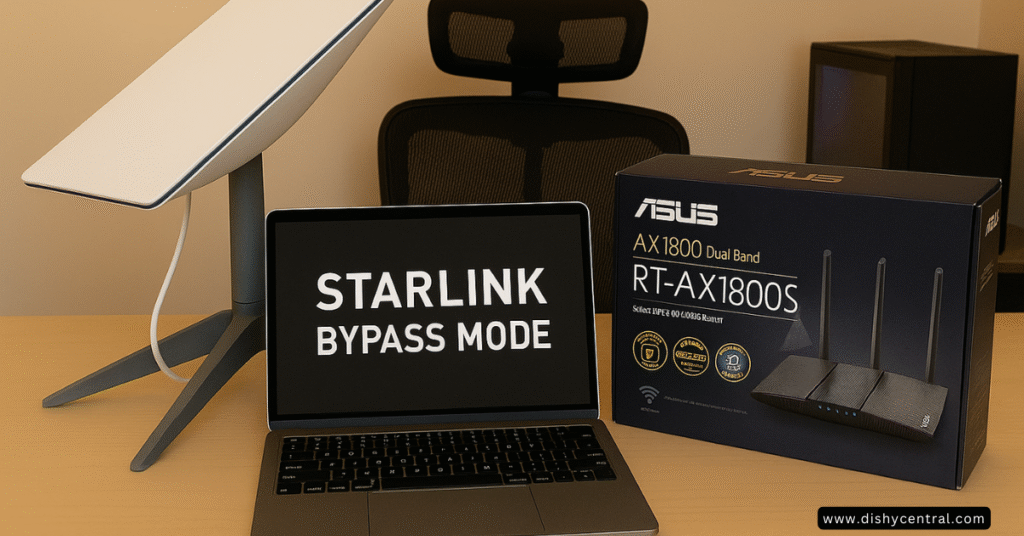
Are you tired of your Starlink router’s limitations holding back your home network? You’re not alone. While Starlink has revolutionized internet access for millions, the included router can fall short for people who want more control, wider Wi‑Fi coverage and advanced features.
Starlink Bypass Mode is a built-in setting that turns off the Starlink router’s Wi‑Fi and routing, so a third-party router can run your home network. This guide covers what bypass mode is, what you need, how to turn it on and off, the problems people run into, and answers to common questions.
How this guide was written: it is a research-based guide compiled from Starlink’s Help Center articles (linked throughout and listed at the end) and commonly reported user experience. It is not a hands-on test of specific routers. Starlink’s app screens and hardware vary, so follow the linked Starlink article for your kit if a step doesn’t match. Last reviewed: September 2026.
Key Takeaways
- Bypass mode turns off your Starlink router’s Wi‑Fi so a third-party router can manage your network. A violet light on the router shows it is in bypass mode
- Gen 2 routers need the Starlink Ethernet Adapter to connect a third-party router. Gen 3 routers have built-in Ethernet ports
- Turning bypass mode off means factory resetting the router, according to Starlink
- Starlink can’t guarantee performance or compatibility with third-party equipment, and some Starlink app features may not work as expected
- Not everyone needs bypass mode. Consider your Wi‑Fi coverage and features first
- What Is Starlink Bypass Mode? Understanding the Basics
- Starlink Bypass Mode: Pros and Cons You Need to Know
- Step-by-Step Guide: How to Enable Starlink Bypass Mode
- Choosing the Right Router for Starlink Bypass Mode
- Common Starlink Bypass Mode Issues and Solutions
- How to Disable Bypass Mode and Return to Standard Setup
- Advanced Configuration Tips for Power Users
- The Future of Starlink and Custom Networking
- Conclusion: Is Starlink Bypass Mode Right for You?
- Official Starlink Resources Used in This Guide
- Frequently Asked Questions
What Is Starlink Bypass Mode? Understanding the Basics
Starlink Bypass Mode is a built-in feature that turns off the Starlink router’s Wi‑Fi so your own router can take over. Starlink describes it as replacing the Starlink router with a third-party router: you connect the third-party router to the Starlink router and switch on bypass mode in the Starlink app.
Normally your Starlink router does two jobs: it connects to the dish and it manages your home network (Wi‑Fi, addresses, firewall). In bypass mode it gives the network-management job to your own router.
| Normal setup | Bypass mode | |
|---|---|---|
| Wi‑Fi | Starlink router | Your router (Starlink’s Wi‑Fi is off) |
| Network management | Starlink router | Your router |
| Connection | Devices connect to Starlink Wi‑Fi | Your router plugs into an Ethernet port on the Starlink router |
| Router light | Normal | Violet, which indicates bypass mode |
| Starlink app | Full router settings | Some features may not work as expected |
Why Bypass Mode Matters for Starlink Users
The standard Starlink router works, but bypass mode addresses a few limits:
- Limited Wi‑Fi coverage: the built-in router may struggle to cover larger homes or areas with interference. A third-party router or mesh system can help with dead zones.
- Basic feature set: Starlink’s routers don’t support port forwarding or firewall rules (Starlink says so in its IP address article). Some users also want Quality of Service (QoS), a VPN server or detailed parental controls, which many third-party routers offer.
- Newer Wi‑Fi standards: with your own router you can move to newer standards such as Wi‑Fi 6E or Wi‑Fi 7 without waiting for Starlink hardware updates.
Starlink Bypass Mode: Pros and Cons You Need to Know
The Compelling Advantages
Better Wi‑Fi and local performance: a good third-party router can improve coverage, and the speed of your local network. Your internet speed still comes from your Starlink service, and Starlink says it can’t guarantee performance with third-party equipment.
Advanced networking features, depending on the router you choose:
- Advanced QoS for prioritizing traffic
- VPN client and server support
- Detailed network monitoring and analytics
- Firewall and port forwarding controls (note the limits described in the double NAT section below)
- Guest network isolation
Better coverage: mesh systems and high-gain antennas can improve Wi‑Fi coverage in large or multi-floor homes.
More Ethernet ports: connect several wired devices without buying extra switches.
Potential Drawbacks to Consider
Additional cost: routers suitable for bypass mode often cost from around $150 to $500 or more. Prices change, so check current prices.
Setup complexity: it isn’t hard, but configuring a third-party router takes more technical knowledge than the default setup.
Double NAT and CGNAT: an incorrect setup can create network issues that affect gaming, video calls and peer-to-peer connections. See the “Resolving Double NAT Issues” section for what bypass mode can and can’t fix.
Reduced Starlink app functionality: Starlink says some app features may not work as expected with a third-party router.
Exiting means a factory reset: according to Starlink, you leave bypass mode by factory resetting the router.
| Your situation | Is bypass mode worth considering? | Why |
|---|---|---|
| Small home, few devices, Wi‑Fi works fine | Probably not | The standard router is enough |
| Large or multi-floor home with dead zones | Yes, often | A better router or mesh can fix coverage |
| You need QoS, VPN server or firewall rules | Yes | Starlink’s router lacks these |
| You want to open ports from the internet | Not on its own | Default IPv4 uses CGNAT (see below) |
| You just want faster internet | No | Bypass mode doesn’t change your Starlink speed |
Step-by-Step Guide: How to Enable Starlink Bypass Mode
Prerequisites: What You’ll Need
Before starting, make sure you have:
- A third-party router with an Internet (WAN) port. A gigabit port is recommended so it doesn’t bottleneck your connection
- Ethernet cables
- A Starlink Ethernet Adapter if your router needs one (see the table below)
- The Starlink app on your phone
| Your Starlink hardware | How you connect your router | Note |
|---|---|---|
| Gen 2 router | Through the Starlink Ethernet Adapter | The Gen 2 router has no Ethernet ports of its own. See Starlink’s Ethernet ports article |
| Gen 3 router | Directly into one of its built-in Ethernet ports | See Starlink’s Gen 3 router setup guide |
| Gen 3 router with a Standard Actuated dish | Adapter required for the dish connection | Starlink says an Ethernet adapter is needed and is sold in the Starlink shop |
| Starlink Mini | Through an Ethernet adapter | Starlink recommends its official Mini Ethernet cable to keep the Mini weatherproof. See Can I use my own router with the Starlink Mini? |
Gen 2 router owners: Starlink sells the official Ethernet Adapter in the Starlink shop, and third-party adapters are sold on Amazon. The one below (FONKEN) is listed for the Gen 2 router only. Its listing says it does not fit the latest Standard Kit with the kickstand base, and the Gen 3 router and Router Mini already have Ethernet ports, so check your router generation first. Our Starlink Ethernet adapter guide explains which hardware needs one.
Affiliate link: if you buy through it we may earn a commission at no extra cost to you. See our affiliate disclosure.
Enabling Bypass Mode on Gen 2 Starlink Routers
- Plug the Starlink Ethernet Adapter into your Gen 2 router
- Connect an Ethernet cable from the adapter to your third-party router’s Internet (WAN) port
- Make sure all connections are secure
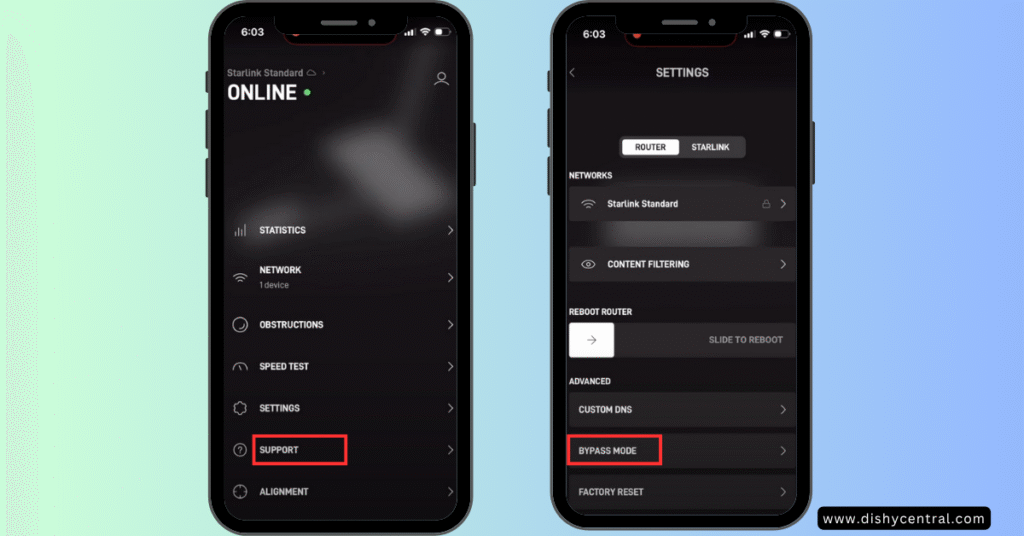
- Open the Starlink app and go to Settings
- Turn on bypass mode. The Starlink router’s Wi‑Fi turns off and a violet light shows it is in bypass mode
- Give the connection a few minutes to settle, then test on your own router’s Wi‑Fi
Menu names can vary by app version. See Starlink’s What is bypass mode? for the current steps.
Enabling Bypass Mode on Gen 3 Starlink Routers
The process is similar but simpler, because the Gen 3 router has built-in Ethernet ports:
- Connect your third-party router’s Internet (WAN) port directly to one of the Gen 3 router’s Ethernet ports
- Open the Starlink app and go to Settings
- Turn on bypass mode and look for the violet light
- Test on your own router’s Wi‑Fi
Example scenario (illustrative): A large two-story home has weak Wi‑Fi upstairs. The owner plugs a mesh router’s Internet port into the Starlink router, switches on bypass mode in the app, sees the violet light, and sets up the mesh system’s own Wi‑Fi name and password. The upstairs rooms now get a strong signal. The internet speed is unchanged, because it still comes from Starlink.
Configuring Your Third-Party Router
Once bypass mode is active:
- Router mode: make sure your third-party router is in “Router Mode” (not Access Point or Bridge mode)
- WAN settings: most routers will obtain an address automatically by DHCP
- IPv6: Starlink supports IPv6 on all routers, kits and plans, so turn on IPv6 on your router if you want it
- Wi‑Fi: set your preferred network name and password
- Test: check connectivity on several devices
About the tool below: it gives general guidance based on your answers, using what Starlink documents about its hardware. It is not tested advice, and it doesn’t show prices because they change. Starlink can’t guarantee compatibility with third-party equipment, so check Starlink’s Help Center before you buy.
Bypass mode checker
Answer six questions to see whether bypass mode is worth it for your setup, and what you would need.
General guidance, not tested advice. Starlink can’t guarantee performance or compatibility with third-party equipment, and its documentation changes, so check Starlink’s Help Center before you buy.
Choosing the Right Router for Starlink Bypass Mode
Essential Features to Look For
- Wi‑Fi 6 or 6E support: newer standards handle many devices better
- Enough processing power: for your plan’s speed and your device count. Manufacturer specs and reviews will tell you more than a single number
- Gigabit Internet (WAN) port: helps avoid bottlenecking your Starlink connection
- Mesh capability: useful for larger or multi-floor homes
- Full router mode: the ability to run as the main router, not only as an access point
Top Router Recommendations by Category
These are examples of routers and systems people commonly use with Starlink. We haven’t tested them, and Starlink can’t guarantee compatibility with third-party equipment, so read current reviews before buying.
| Category | What to look for | Examples commonly used |
|---|---|---|
| General use | Wi‑Fi 6/6E, good reviews, easy setup | ASUS AX-series routers |
| Gaming | QoS and low-latency features | Gaming-oriented ASUS or Netgear routers |
| Budget | Solid Wi‑Fi 6 at a lower price | TP-Link Archer series |
| Large homes | A mesh system | Eero Pro 6E, Netgear Orbi, ASUS AiMesh |
Common Starlink Bypass Mode Issues and Solutions
| Symptom | Likely cause | First fix |
|---|---|---|
| No internet after enabling bypass | Cable in the wrong port, router not in Router mode | Check the WAN cable and router mode; power cycle everything |
| Gaming or calls acting up | NAT type or router settings | See the NAT section below |
| Slower than expected | Router limits or settings | Test wired, update firmware, review QoS |
| Starlink app can’t find the router | Bypass mode changes how the app reaches the router, and Starlink says some features may not work | Try joining your own router’s Wi‑Fi; see Starlink’s third-party router article |
Troubleshooting No Internet Connection
Problem: no internet after enabling bypass mode.
- Verify all physical connections are secure and the third-party router’s cable is in its Internet (WAN) port
- Power cycle the whole system: unplug the dish and routers for 30 seconds and plug them back in (see our troubleshooting guide)
- Check that your third-party router is in Router Mode
- Make sure its WAN settings are set to DHCP
- Check that the Starlink router shows the violet bypass light
Resolving Double NAT Issues
Problem: gaming or video-call issues after setup. It helps to know what bypass mode changes and what it doesn’t.
- Starlink’s default IPv4 setup uses carrier-grade NAT (CGNAT), with private addresses in the 100.64.0.0/10 range assigned by DHCP. The default policy doesn’t allow inbound IPv4 traffic
- Bypass mode doesn’t change that. Starlink says customers who need inbound IPv4 traffic should use a third-party router and a Starlink plan with the public IPv4 option
- Starlink supports native IPv6 on all routers, kits and plans, with a delegated /56 prefix, which you can use for inbound connections if your router supports it and you allow the traffic in its firewall
To reduce problems, confirm bypass mode is on, make sure your router isn’t in bridge mode, and avoid running two routers at once. UPnP or port forwarding help within your own network, but they can’t create inbound IPv4 access through CGNAT. See our static IP guide for options.
Addressing Slow Speeds
Problem: speeds are slower than expected.
- Test speeds with a wired device to separate Wi‑Fi from the connection itself
- Check for firmware updates on your third-party router
- Make sure QoS settings aren’t limiting bandwidth
- Consider the router’s processing capability under load
- If you can, compare with a device connected by cable straight to your router
How to Disable Bypass Mode and Return to Standard Setup
If you need to turn off Starlink bypass mode and go back to the standard router, Starlink’s Help Center says you exit bypass mode by factory resetting the router. A factory reset erases your custom Wi‑Fi name, password and settings, so you will need to set the router up again.
| Reset method | How | Notes |
|---|---|---|
| Reset button | Gently press the button on the bottom of the router with a paperclip. The light briefly turns blue, then wait for a solid white light | Works even if Starlink’s Wi‑Fi is off |
| In the Starlink app | Connect to the Starlink Wi‑Fi, then open Settings, Router, Factory Reset and drag the slider | Starlink’s Wi‑Fi is off in bypass mode, so this may not be reachable |
| Mesh nodes | Reset any Starlink Mesh nodes after the primary router | See Starlink’s factory reset article |
For Gen 2 Routers
- Use the reset button method above
- Wait for the router to reboot completely
- Set up the router again in the Starlink app
For Gen 3 Routers
The process is the same: factory reset the router with the reset button (or the app if you can reach it), then set it up again. Some app versions may offer other ways to leave bypass mode, but Starlink’s article names the factory reset as the way to exit, so use that if the app doesn’t offer a switch.
Advanced Configuration Tips for Power Users
Optimizing QoS Settings
On your third-party router, QoS can prioritize:
- Video streaming services
- Gaming traffic
- Video conferencing applications
- VoIP calls
VPN Configuration
Many users set up a VPN server on their router to:
- Access their home network remotely
- Protect their traffic on public Wi‑Fi
- Connect sites together (see our site-to-site VPN guide)
Network Monitoring
Advanced routers offer detailed bandwidth monitoring, which helps you:
- Identify bandwidth-hungry devices
- Monitor network performance over time
- Troubleshoot connectivity issues
The Future of Starlink and Custom Networking
Starlink hasn’t published plans for its router features, so predictions are speculation. What is documented today: bypass mode is a supported setting, Starlink supports IPv6 on all routers, and Starlink hardware and app features change over time. Check Starlink’s What is bypass mode? article for the current rules before you buy equipment.
Conclusion: Is Starlink Bypass Mode Right for You?
Starlink Bypass Mode can help people who need better Wi‑Fi coverage or advanced features. It takes extra money and setup, and Starlink can’t guarantee compatibility with third-party equipment, so it isn’t necessary for everyone.
Consider bypass mode if you:
- Have a large home that needs better Wi‑Fi coverage
- Need advanced networking features such as a VPN server, detailed QoS or firewall rules
- Want to use newer Wi‑Fi standards than the Starlink router offers
- Run into limits with the standard Starlink router
If your Wi‑Fi already works well, the standard setup is simpler. If you go ahead, use the steps above, remember that leaving bypass mode means a factory reset, and check Starlink’s articles for changes.
Spotted something out of date? Let us know through our contact page.
Official Starlink Resources Used in This Guide
- What is bypass mode?
- Can I add a third-party router or mesh system?
- Using a Third-Party Router with Starlink
- Can I use my own router with the Starlink Mini?
- What IP address does Starlink provide?
- Gen 3 Router: Setup Guide
- How do I factory reset my router?
- Does the WiFi router have any Ethernet (LAN) ports?
Frequently Asked Questions
Does bypass mode affect my Starlink speeds?
Bypass mode itself doesn’t change your internet speed, which comes from your Starlink service. A good third-party router can improve Wi‑Fi coverage and local speeds compared with the standard router, but Starlink says it can’t guarantee performance with third-party equipment.
Can I use any router with Starlink bypass mode?
Most routers with an Internet (WAN) port can be used, but Starlink can’t guarantee compatibility or performance with third-party equipment. A gigabit WAN port and Wi‑Fi 6 or newer are sensible things to look for. See Starlink’s third-party router article.
Will I lose access to Starlink app features?
Starlink says some app features may not work as expected with a third-party router. Router-specific settings are the ones most likely to be affected, since your own router now manages the network. Check the app after enabling bypass mode to see what still works for you.
Is bypass mode reversible?
Yes. According to Starlink, you exit bypass mode by factory resetting the router. You then set the router up again in the app.
Does bypass mode void my Starlink warranty?
The Starlink articles reviewed for this guide don’t say whether bypass mode affects your warranty, and the older version of this page claimed it doesn’t without a source. Check Starlink’s terms or ask Starlink support before relying on either answer.
Can I use a mesh system with bypass mode?
Starlink’s Help Center says you can add a third-party router or mesh system. Mesh systems often help larger homes or areas with Wi‑Fi interference. Popular options include Eero, Netgear Orbi and ASUS AiMesh, though Starlink can’t guarantee compatibility with any of them. See Can I add a third-party router or mesh system?.
How do I turn off Starlink bypass mode?
Starlink says to factory reset the router. Use the reset button on the bottom of the router (press it gently with a paperclip; the light turns blue briefly, then solid white), or the app’s factory reset if you can reach it. Then set the router up again. See the “How to Disable Bypass Mode” section above.
What does the violet light mean on a Starlink router?
Starlink says a violet light indicates that the router is in bypass mode.
Do I need the Starlink Ethernet Adapter for bypass mode?
It depends on your hardware. The Gen 2 router has no Ethernet ports, so it needs the adapter. The Gen 3 router has built-in Ethernet ports. Starlink says a Gen 3 router used with a Standard Actuated dish needs an adapter, and the Mini needs one too. See our Ethernet adapter guide.
Will port forwarding work with bypass mode?
Bypass mode lets you use port forwarding on your own router, but Starlink’s default IPv4 uses CGNAT, which doesn’t allow inbound traffic. Starlink says inbound IPv4 needs a plan with the public IPv4 option. IPv6 is supported on all plans. See our static IP guide.

