

You’ve just opened the Starlink app, expecting to see that reassuring “Online” status, but instead there’s a red or grey bar that says “Restricted.” Your heart sinks. Is your internet gone? Did you break some hidden rule? Did your dish fail?
Take a breath. This guide explains what the message means and how to fix it. Unlike a simple disconnection, a Starlink restricted status usually means your dish can still reach the network, but Starlink has deliberately limited your service for a specific reason, such as billing, where the dish is being used, or the plan you are on.
Most restricted messages point to something you can check from your account: a failed payment, the registered service address, your plan, or how the dish is being used. The steps below help you work out which one applies.
How this guide was written: it is a research-based guide compiled from Starlink’s Help Center articles, its Terms of Service and plan descriptions (all linked at the end), and from messages Starlink users report. It is not a hands-on test. Starlink renames plans and changes fees and rules often, so confirm the current terms in your own account. Last reviewed: September 2026.
Key Takeaways
- “Restricted” doesn’t mean disconnected: the dish is usually still working, but Starlink has limited your service
- Billing and account problems are common causes: a failed payment can restrict service quickly
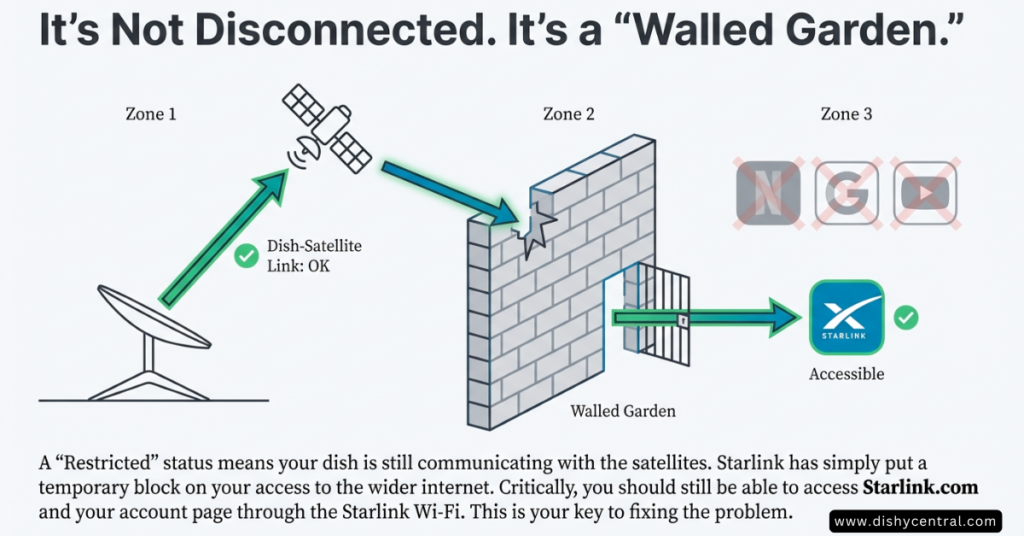
- Starlink’s own site usually stays reachable: from a device on your Starlink Wi‑Fi you can typically still open starlink.com to fix billing or plan issues
- Location and plan rules matter: Residential service is designed for use at your registered service address, and Roam plans have limits on use abroad
- The exact wording tells you the fix: “Service Disabled” is generally more serious than a simple “Restricted”
Understanding the “Restricted” Panic: What’s Actually Happening
When you see a restricted notification, the terminal is typically still powered and connected. It is the service that is limited. Think of a locked door: the house is still there, you’re just not allowed inside until the reason is resolved.
This is different from a “Disconnected” or “Offline” status, which usually points to a technical problem with your setup. Restricted means Starlink’s systems have limited your service.
| Status | What it usually means | Where to look first |
|---|---|---|
| Restricted | Starlink has limited your service (billing, location, plan or terms) | Your Starlink account and plan; the exact message wording |
| Offline | The dish is not connected. Starlink lists account or data limits, router connectivity, new obstructions, storms and relocation among the causes | Starlink’s Suddenly Offline article and our troubleshooting guide |
| Disconnected | The app can’t reach your Starlink router (for example the phone is on a different Wi‑Fi, or a VPN is on) | Join the router’s Wi‑Fi and turn off any VPN |
| Searching | The dish is looking for satellites to connect to | Sky view, cables and a restart |
The “Walled Garden” Advantage
Even in restricted mode, owners commonly report that they can still open starlink.com and manage their account from a device on their Starlink Wi‑Fi. This “walled garden” access appears to be intentional: it lets you fix billing issues or change your plan without needing an alternative internet connection.
Example scenario (illustrative): A card expires. The next morning, the app shows Restricted, and websites won’t load, but starlink.com opens. The account page shows a failed payment. Adding a new card is the whole fix. Nothing was wrong with the dish.
Pro tip: if the Starlink app is slow or won’t load properly, open a web browser on your phone while connected to your Starlink Wi‑Fi and go directly to starlink.com. The browser version can be easier to use for account changes when you are restricted.
Quick Diagnostics: Decoding Your Specific Error Message
Not all restricted messages are the same. Starlink uses different wording depending on the cause, and the exact wording is the fastest clue to the fix. Wording varies by app version, region and plan, so treat these tables as a guide, not an official list.
| Status Message (as commonly reported) | Likely Cause | Typical Effort to Fix |
|---|---|---|
| “Restricted” | Billing issue or data limit reached | ✓ Low |
| “Service Paused” | Paused by you, or the plan has expired | ✓ Low |
| “Location Restricted” | Residential plan used away from the registered service address | ⚠ Medium |
| “Service Disabled” | Unauthorized location, time limit abroad exceeded, or a Terms of Service problem | ✗ High |
| “Unexpected Location” | The terminal’s location doesn’t match the account (sometimes seen with secondhand units) | ⚠ Medium |
The Exact Messages People Search For
These are two messages that Starlink users search for word for word. Here is what each one points to.
Message 1: “Your Starlink’s service is restricted because it is too far from its service address. To resume service, use Starlink at its registered address or switch to a service plan that supports mobile use.”
- What it points to: Residential service is designed for use at your registered service address. Starlink restricts it when the dish is used too far away
- What to do: return to your service address (service should resume), update the address if you have moved permanently, or switch to a plan that supports use away from home. See Starlink’s alerts article and how to change your service address
Message 2: “Your service line is restricted for business or enterprise use in violation of our terms of service. Upgrade your plan to resume high-speed service.”
- What it points to: Starlink’s Terms prohibit business or enterprise use of Residential and Roam plans
- What to do: upgrade to a plan that allows business use (see our business vs residential guide) or stop the business use. If you believe the message is a mistake, contact Starlink support. See the Terms of Service
A payment or billing message: this points to a failed or declined payment. Update your payment method at starlink.com (see Cause #1 below).
Take a screenshot of your exact error message before trying any fixes. If you end up needing to contact Starlink support, having it will speed up the process.
Cause #1: Billing & Account Issues (A Common Culprit)
Billing problems are one of the most common reasons an account is restricted. When a payment fails, service can be limited quickly, so check your account first.
The “Payment Declined” Loop
A payment can fail for reasons other than insufficient funds. An expired card gets overlooked, a card issuer flags a recurring or international charge as suspicious, or the billing address no longer matches what the bank has on file.
Starlink doesn’t publish a grace period, and owners commonly report service being restricted soon after a failed payment rather than after a warning period.
The fix is straightforward:
- Connect a device to your Starlink Wi‑Fi (you should still be able to reach your account while restricted)
- Open a web browser and go to starlink.com. Avoid the app at first if it is slow or unreliable during restriction
- Sign in and go to the billing section
- Update your payment method or pay the outstanding balance
- Wait a few minutes for the account to update. Starlink doesn’t publish an exact time
If you are still restricted after the payment goes through, restart the Starlink router by unplugging it for 30 seconds and plugging it back in (see our restart steps).
| Billing problem | How to spot it | Fix |
|---|---|---|
| Expired card | Card date has passed; payment failed notice in the account | Add a new card |
| Bank declined the charge | Card is valid but the payment fails | Ask the bank to allow the charge, or use another card |
| Billing address mismatch | Payment fails after an address change | Make the billing address match the one your bank holds |
| Outstanding balance | Account shows an unpaid amount | Pay it in the billing section |
The Data Cap Surprise
Some plans include a priority data allowance. Depending on the plan, going over it can slow your service or limit it until you buy more data or your billing cycle resets. Check your usage in your Starlink account or app, and see our Starlink data caps guide. Plan and add-on names vary, so read your plan’s description in your account.
The Transfer Trap (Buying Used Equipment)
Bought a secondhand Starlink terminal from an online marketplace? This is where things can get complicated.
Each terminal is registered to an account. If the previous owner’s account still holds it, or that account has an unresolved issue, the terminal can show as restricted or refuse to activate.
Here’s how to check and fix this:
- Compare the kit or serial number printed on your dish with the one shown in your account
- If they don’t match, or you see a message that the device is already in use, ask the previous owner to remove it from their account
- If you can’t reach the seller, contact Starlink support with your proof of purchase
- Expect it may take some time. Starlink doesn’t publish a fixed timeline for transfers
Buying directly from Starlink or an authorized reseller avoids this risk. What you save on a used unit can be lost quickly if you end up paying for a subscription you can’t use.
Example scenario (illustrative): Someone buys a used dish and finds it shows as restricted after setup. The serial number in the app belongs to the seller’s account. Once the seller removes the dish from that account, the buyer can register it and the restriction clears.
Cause #2: The “Mobile/Roam” Restrictions
If you use Starlink while traveling, in an RV, at a cabin or anywhere away from your registered address, the plan you are on decides what is allowed. Plan names and rules change, so check your account and Starlink’s plan descriptions. Here is what Starlink’s published documents say.
| Plan type | Designed for | Things to know |
|---|---|---|
| Residential | Use at your registered service address | Restricted when used too far from that address. The Terms prohibit business or enterprise use |
| Roam | Use away from your home address, including travel | Time limits apply abroad (see below). The Terms prohibit business or enterprise use. See What are the Roam service plans? |
| Priority plans | Business and other priority-data use | Enterprise, institutional and government support is only available on Priority plans. The Terms allow reselling as community Wi‑Fi or a hotspot on a Priority plan |
| Maritime plans | Use at sea | Roam covers marinas, inland waterways and coastal waters up to 12 nautical miles. Beyond that you need a maritime plan |
The “2-Month Rule” for Roaming Abroad
Roam lets you use your dish in another country for a limited time. Starlink’s Help Center describes up to two months (about 60 days) outside your registered country, after which service may be suspended. Some plans have shorter limits: for example, Starlink describes 30 days at a time on Roam Unlimited. If you plan to stay longer, Starlink suggests moving the terminal to an account registered in the new country. See Traveling with Starlink Roam.
The symptoms look like this:
- Service works normally for weeks while you travel
- Then, after some time, you get a “Restricted” or “Service Disabled” message
- The app may show that your location is outside your service area
- Reconnecting fails repeatedly
The fix: the options are to return to your home country, follow Starlink’s guidance for moving the terminal to an account registered in the country you are in (where service is available), or move to a plan designed for long-term international use. Changing your registered address to another country is not supported for longer stays, according to Starlink’s Help Center.
Example scenario (illustrative): A traveler with a U.S.-registered dish spends a winter in another country. Everything works for several weeks. After about two months, service is restricted with a message about use outside the home country. The traveler’s options are to return home, or ask Starlink about moving the terminal to an account in the new country.
If you are a genuine full-time traveler or digital nomad, look at plans designed for long-term international use and check the current pricing, since these change.
“Sold Out” Cells and Deprioritization
Even when you follow every rule, roaming in a busy area can feel like restricted service. In places where Starlink is at capacity, service can be slower or limited, especially on plans without priority data. The app may still show “Online” while speeds are poor.
- Check Starlink’s availability map for your location
- Consider a plan with priority data if you rely on the connection
- Test at different times of day to see whether the slowdown follows busy hours
- If the location is consistently congested, moving to a different spot can help
See our Starlink data caps guide for how plan priority can affect speeds.
Cause #3: Geo-Fencing & Unauthorized Countries
Starlink is available in many countries, but not everywhere. Licensing and regulation decide where service is authorized, so having a dish doesn’t mean you can use it anywhere in the world.
The “High Seas” & International Blocks
If a terminal is used in a location where Starlink service isn’t available, expect a “Service Disabled” style message. There is no setting that changes this. Check Starlink’s availability map to see where service is offered before you travel, and use the terminal only where it is authorized.
The “Ocean” Trap
Planning to use Starlink on a boat? Starlink’s Roam plans cover marinas, inland waterways and coastal waters up to 12 nautical miles. Beyond that, or for extended time on the water, you need a maritime plan. Starlink’s Terms also prohibit commercial, business or enterprise use of the Personal Maritime plan. Check What are the Roam service plans? and your account for current options.
The fix: if you need ocean coverage, change to a plan that includes it through your Starlink account. Settings changes on the dish won’t alter this restriction.
The Starlink Mini Limitation
Some Mini owners report a restricted status in places where a standard dish works. Starlink hasn’t published a reason. If it happens to you, check the plan attached to the Mini, the service address on the account, and the alerts in the app, and contact Starlink support if it persists.
Cause #4: Hardware & Installation Triggers
Hardware problems are less common than billing or location issues, but they can trigger a restricted or restricted-looking status. They are frustrating because they can look like account problems when the real issue is physical.
GPS Spoofing or Jamming Detection
Your Starlink terminal uses GPS to know where it is. If it can’t get a reliable position, or reports an unexpected one, service can be limited or the app can show location-related alerts. Possible causes include a blocked view of the sky, strong radio interference nearby, or tampering with the hardware. Modifying hardware can also breach Starlink’s Terms.
- Clear anything blocking the dish’s view of the sky
- Move the dish away from radio equipment or other strong sources of interference
- Undo any hardware modifications
- Check the alerts in the app (see Starlink’s alerts article)
The “Stow” Bug
Some owners report a terminal that seems stuck in “stow” mode (the motorized parts retracted) even though it is deployed, with the status jumping between “Searching,” “Restricted” and briefly “Online.” Starlink hasn’t published this as a known issue, so treat the steps below as owner-reported.
- Restart the system: unplug the dish and router for 30 seconds, then plug them back in
- Check that the dish can move freely and has a clear view
- If it persists, factory reset the router using one of Starlink’s methods in the table below, then set it up again
- If you have Mesh nodes, factory reset them after the primary router
- Contact Starlink support if the problem continues
| Reset method | How | Notes |
|---|---|---|
| In the Starlink app | While on the Starlink Wi‑Fi, open Settings, then Router, then Factory Reset, and drag the slider | Menu names can vary by app version |
| Reset button on the router | Gently press the button on the bottom of the router with a paperclip. The light briefly turns blue, then solid white | Interrupts service until you set the router up again |
| Mesh nodes | Starlink’s article describes unplugging a mesh node and plugging it back in six times in a row | Reset the nodes after the primary router |
You may see advice to unplug the router six times with 30-second waits. Starlink’s factory reset article describes the six-power-cycle pattern for mesh nodes, not a timed 30-second cycle for the router. A factory reset erases your custom Wi‑Fi name, password and settings. See How do I factory reset my router?.
Firmware Update Failures
Starlink pushes updates automatically. When an update has downloaded, the device reboots to apply it, scheduled for about 3 AM local time (plus or minus 30 minutes). If an update is in progress or fails partway, the app can show update-related messages and service can be interrupted.
Give the system time with power and a clear view of the sky, and avoid repeated reboots while an update is running. If an update doesn’t install automatically, follow Starlink’s update article.
Step-by-Step Troubleshooting Flowchart
You’ve read about the possible causes, but what’s your next step? Follow this decision guide to work out what is behind your Starlink restricted message.
| Step and question | If yes | If no |
|---|---|---|
| Step 1. Can you open your account (browser or app)? | Check billing and plan | Go to step 2 |
| Step 2. Are you away from your registered address, abroad, or on the water? | Check plan and location rules | Go to step 3 |
| Step 3. Does the app show hardware or GPS alerts for more than a few minutes? | Fix the hardware cause | Go to step 4 |
| Step 4. Still restricted after fixing the apparent cause and waiting? | Contact Starlink support | Monitor; the restriction should clear |
Step 1: Check App Access
Can you open the Starlink app or starlink.com and reach your account page? This is the critical first test.
If YES: you have walled garden access. Go to your account’s billing section and look for outstanding balances, payment failures or subscription issues. If you see any red flags, update your payment method and wait a few minutes.
If NO: go to Step 2. Not being able to reach even your account suggests a more serious connectivity or account issue.
Step 2: Check the Coverage Map
Open Starlink’s availability map and check your current location against it, and compare it with your account details.
Key questions to answer:
- Is service available at your current location, or is the area at capacity?
- How far are you from your registered service address?
- If you are using Roam abroad, how long have you been outside your home country? Starlink describes about two months
If you are on a Residential plan away from your registered address, your options are to return to it, update your service address if you have permanently moved, or switch to a plan that supports use away from home. See Starlink’s alerts article.
Step 3: Inspect Hardware Status
Look at the app’s status and alert screens for hardware alerts, such as motor, GPS, obstruction or booting messages, that last more than a few minutes.
Common hardware fixes:
- Clear any physical obstructions blocking the dish’s view of the sky
- Make sure the dish isn’t near metal structures or radio equipment
- Check all cable connections for damage or looseness
- Restart the Starlink by unplugging the power for 30 seconds
Step 4: Contact Support (The Nuclear Option)
If you have worked through the previous steps and you are still seeing restricted access, it’s time to contact Starlink support. Prepare this information first so you can get your Starlink working again as quickly as possible:
- A screenshot of the exact error message from the Starlink app
- The app’s debug or advanced data, if your version offers it
- When the issue started and any changes you made beforehand
- Your service plan type, and whether you are at your registered location
To contact Starlink support, sign in at starlink.com, open Support and create a ticket. Creating a ticket on the website is often easier than using the app’s help center during a service interruption. Response times vary by issue and workload, so include all the details in your first message.
Summary Checklist: Quick Diagnostics Before You Panic
Before you spend hours troubleshooting or submit a support ticket, run through this rapid checklist. It covers the most common causes of restriction.
Your 5-Minute Diagnostic Checklist
✓ Is your bill paid? Check for failed payments or outstanding balances in your account
✓ Does your address match your current location? Verify you’re at your registered address, or that your plan supports use away from home
✓ Do you have the right plan for your usage? Check whether you need a different plan for roaming abroad, ocean use or business use
✓ Is your dish seeing the sky? Confirm you have a clear view with no obstructions
✓ Have you recently moved or traveled? Consider whether you’ve passed a roaming time limit or entered an area where service isn’t available
✓ Is an update in progress? Check if an update is running or failed partway through
✓ Did you buy used equipment? Verify the terminal is properly registered to your Starlink account
When to DIY vs. When to Call Support
You can typically fix a restricted status yourself if:
- It’s billing-related and you can reach your account to update the payment
- You know you’re outside your service area and can update your address, switch plans or return home
- Hardware issues respond to basic troubleshooting (restarts, cable checks)
- You’re getting “Restricted” or “Service Paused” messages (lower effort)
You need to contact Starlink support if:
- You see “Service Disabled” or “Terms of Service violation” messages
- The restriction persists after fixing the apparent cause and waiting 24 hours or more
- You’re dealing with an equipment transfer dispute or account ownership issue
- Hardware shows persistent errors that don’t clear with restarts or resets
- You have questions about plan changes or where your service is authorized
Final Thoughts: Restricted Doesn’t Mean Hopeless
Most causes of Starlink’s restricted status can be traced to something in your account, plan or location, and many can be fixed once you identify the root cause.
The key is understanding that “restricted” is different from “broken.” Your dish is usually working. Something in your account status, location or plan configuration is preventing normal internet service. That is often good news, because account and plan issues are easier to resolve than hardware failures.
Don’t ignore small warnings in your Starlink app. Payment notifications, data usage alerts and location warnings are your early warning system. Address them early and you can avoid most restricted status situations.
Starlink changes its plans, fees and rules over time. Keep your billing current, understand the limits of your specific plan, and follow the geographic rules that apply to how you use the dish.
Found a restricted message this guide doesn’t cover, or spotted something out of date? Let us know through our contact page.
Official Starlink Resources Used in This Guide
- What are the alerts on my Starlink app?
- How do I change my service address?
- My address is correct. Why am I getting a message saying…
- Why do I need a service address for the roaming plan?
- Traveling with Starlink Roam
- What are the Roam service plans?
- Global Roam Discontinued
- Additional FAQs – Account
- How do I factory reset my router?
- How do I update my Starlink if it doesn’t automatically update?
- Suddenly Offline – Troubleshooting
- Starlink Terms of Service
- Service Plan Descriptions
Frequently Asked Questions
What does it mean when my Starlink says restricted?
A restricted status means your dish can usually still reach the network, but Starlink has limited your service. This is different from a disconnection: your hardware is generally working, but account, billing, plan or location issues are preventing normal service. You can typically still reach starlink.com and your account from a device on your Starlink Wi‑Fi, so you can fix many causes yourself.
How do I fix a Starlink location-restricted error?
Location-restricted errors occur when a Residential plan is used away from its registered service address. According to Starlink’s Help Center, service should resume when you return to your service address. If you have permanently moved, update your service address. If you are traveling, switch to a plan that supports use away from home, such as a Roam plan. The restriction lifts once your account configuration matches how you are using the dish.
Can Starlink restrict my service for unpaid bills?
Yes. A failed payment or unpaid balance can lead to restricted or suspended service, and owners commonly report it happening soon after a payment fails. You can usually fix it by updating your payment method through the Starlink website or app, even while restricted.
Why does my Starlink say Service Disabled instead of just Restricted?
Wording varies by app version and region, but a “Service Disabled” message generally points to something more serious than a simple “Restricted” status: use in a location where service isn’t available, exceeding the time limit for use abroad on a Roam plan, or a Terms of Service problem. These usually need a plan change, a location change or contact with Starlink support.
Will a VPN help me bypass Starlink location restrictions?
No. Starlink applies the restriction to your service based on your account and where the terminal is used, not based on the network address of your phone or computer. A VPN on your devices doesn’t change that. The way to use Starlink in a different region is through a plan that allows it.
How long do I have to wait after fixing a billing issue for my Starlink to work again?
Starlink doesn’t publish a fixed time. Owners commonly report service returning within minutes of a successful payment. As a rule of thumb, if it isn’t restored after about 30 minutes, restart your Starlink router and check that the payment actually went through. If you are still restricted after an hour, contact Starlink support, since something else may be blocking service.
Can I use my Residential dish at a second home or cabin?
Starlink says Residential service is designed for use at your registered service address, and it restricts service when the dish is used too far away. For a second location, look at plans that support use away from home, and check the current terms in your account. See Starlink’s alerts article.
Can I run a business on a Residential or Roam plan?
Starlink’s Terms prohibit business or enterprise use of Residential and Roam plans, and Starlink can suspend service for violations. If you see the “restricted for business or enterprise use” message, upgrade to a plan that allows business use. See our business vs residential guide.
How long can I use Roam in another country?
Starlink’s Help Center describes up to two months (about 60 days) in another country outside your registered country, after which service may be suspended, and some plans have shorter limits, such as 30 days at a time on Roam Unlimited. For longer stays, Starlink suggests moving the terminal to an account registered in the new country. Check Traveling with Starlink Roam for current rules.

