
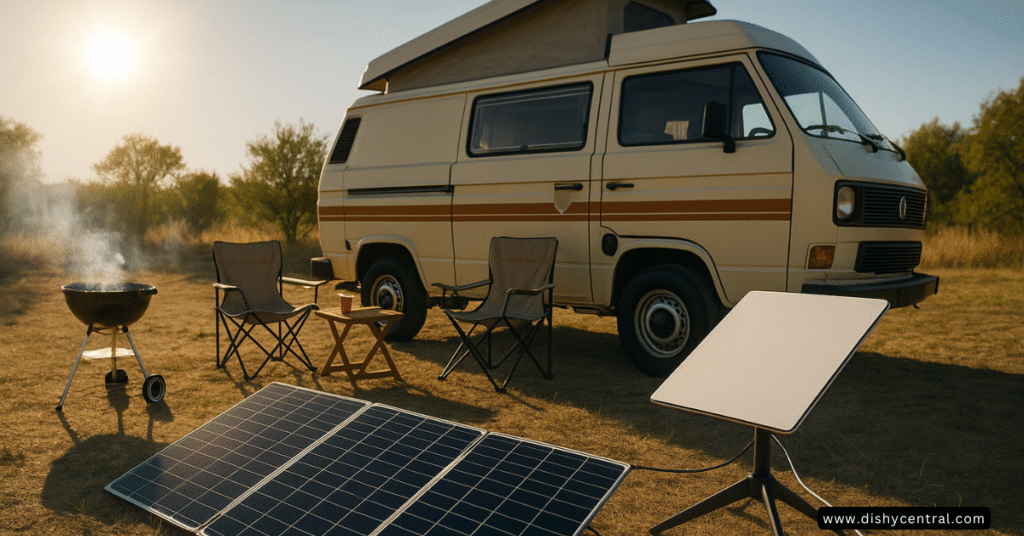
Picture this: You’re watching the sunrise from your RV in the middle of the Utah desert, miles from the nearest power line, yet you’re seamlessly streaming a video call with family back home. Or perhaps you’re in your off-grid cabin during a winter storm, maintaining high-speed internet connectivity while the power grid fails miles away. This isn’t a fantasy – can Starlink be solar powered? Absolutely, and I’m here to show you exactly how.
The combination of SpaceX’s revolutionary satellite internet service and solar energy creates unprecedented freedom. Whether you’re living the van life dream, building a homestead in remote areas, or simply wanting a reliable backup power source for your home internet, solar-powered Starlink opens doors to connectivity that was unimaginable just a few years ago.
What This Guide Offers: This comprehensive guide will walk you through everything from calculating your power needs to choosing between plug-and-play solar generators and custom DIY systems. You’ll discover the exact components needed for different use cases, real-world cost breakdowns, and step-by-step instructions that work whether you’re a complete beginner or a seasoned off-grid enthusiast.
Key Takeaways
- Starlink can be effectively powered by solar energy for continuous operation
- System sizing depends on your usage patterns and location requirements
- Both plug-and-play and DIY solutions offer viable paths to energy independence
- Proper system design ensures reliable connectivity even during cloudy days
- Investment costs range from $800 for basic setups to $5,000+ for comprehensive systems
Understanding Starlink’s Power Needs: The Foundation of Your Solar Setup
Before diving into solar solutions, you need to understand exactly how much power your Starlink system consumes. This knowledge forms the foundation of every decision you’ll make about your solar setup.
Starlink’s Power Consumption Breakdown
The power consumption varies significantly between Starlink models, and understanding these differences is crucial for proper system sizing:
Starlink Standard: The most common residential dish consumes approximately 50W to 75W during active use, dropping to around 20W in idle mode. During heavy usage or adverse weather conditions, power draw can spike to 100W.
Starlink Mini: This newer, portable option is a game-changer for mobile applications. The Starlink mini consumes an average of 15W to 40W during operation, making it perfect for outdoor adventures and smaller solar setups.
High Performance Starlink: Designed for demanding applications, this variant can draw 150W or more during peak usage, with additional power requirements for features like the integrated snow melt system.
Calculating Your Daily Energy Usage
Here’s a simple formula to determine your daily power needs:
Daily Watt-Hours = Average Power Draw × Hours of Use
For example, if you plan to run Starlink standard for 8 hours a day at an average of 45W:
- 45w × 8 hours = 360 watt-hours per day
However, you’ll want to add a 20-30% buffer for system inefficiencies and unexpected usage:
- 360 wh × 1.25 = 450 watt-hours total daily requirement
The Importance of a Power Audit
If your solar system will power more than just Starlink, conduct a comprehensive power audit. List every device, its power consumption, and daily usage hours. Common additions include:
- Wi-fi router: 10-15w continuous
- LED lighting: 5-10W per fixture
- Phone charging: 10-15W for 2-3 hours
- Laptop: 45-65w during use
This audit ensures your solar setup can handle your complete power needs, not just the satellite internet connection.

The Core Components of a Solar Power System for Starlink
A reliable solar power system consists of four essential components working together to convert sunlight into usable electricity for your Starlink system.
Solar Panels: Your Energy Harvest
Monocrystalline panels offer the highest efficiency (18-22%) and perform better in low-light conditions, making them ideal for permanent installations. They’re perfect for RV rooftops and off-grid homes where space is at a premium.
Polycrystalline panels provide a more budget-friendly option with slightly lower efficiency (15-17%) but excellent value for larger installations where space isn’t constrained.
Portable solar panels are foldable units perfect for temporary setups. A 100W portable panel can provide enough power to keep a Starlink mini running during sunny conditions while offering maximum flexibility for camping and mobile use.
Batteries: Your Energy Storage Bank
Lithium-ion batteries (specifically LiFePO4 or lithium phosphate) represent the gold standard for solar applications. They offer:
- Longer lifespan (2,000-5,000+ cycles)
- Higher efficiency (95%+ round-trip)
- Lighter weight and compact size
- Better performance in temperature extremes
Lead-acid batteries (AGM or gel) cost less upfront but require more maintenance and have shorter lifespans. They’re suitable for budget-conscious installations where weight isn’t a concern.
For battery capacity, calculate your daily energy needs and multiply by the number of days you want to operate without solar input. A 200Ah lithium battery provides roughly 2,400 watt-hours of usable energy—enough to power Starlink standard for several days during cloudy weather.
Solar Charge Controllers: Your System’s Brain
The charge controller prevents battery overcharging and optimizes power transfer from your solar panels.
PWM controllers are simple and affordable but less efficient, especially when the panel voltage significantly exceeds battery voltage.
MPPT controllers (Maximum Power Point Tracking) are more sophisticated and efficient, extracting 15-30% more power from your solar panels. For systems over 200W, the additional cost of MPPT pays for itself through improved performance.
Inverters: Converting DC to AC Power
Since Starlink requires AC power, you’ll need an inverter to convert your battery’s 12V DC power to 120V AC. Choose a pure sine wave inverter to ensure clean power that won’t damage sensitive electronics. A small inverter rated for 300-500W is typically sufficient for powering Starlink and a few additional devices.
Essential Supporting Components
Don’t overlook the smaller but crucial components:
- Proper gauge wiring: Use 10-12 AWG for short runs, larger for longer distances
- Fuses and breakers: Essential safety components for every connection
- MC4 connectors: Standard waterproof connectors for solar panels
- Battery monitors: Track your system’s performance and battery health
| Related: Starlink Power Consumption Calculator
Sizing Your Solar System: A Tiered Approach for Every Need
I’ve developed a three-tier approach that matches system complexity and cost to your specific needs and technical comfort level.
Tier 1: The “Weekender” Setup (Basic & Portable)
Use Case: Perfect for camping trips, emergency backup, and occasional remote work. Ideal for Starlink mini users who need connectivity for 4-6 hours daily.
Recommended Components:
- 100w portable solar panel (foldable design)
- Jackery or EcoFlow power station (500-1000wh capacity)
- Built-in inverter and charge controller
- Plug-and-play simplicity
Power Capability: Supports Starlink mini for 12-24 hours on battery alone, with daytime solar recharging extending operation indefinitely in good conditions.
Estimated Investment: $800-$1,200
This setup requires zero technical knowledge—simply unfold your solar panel, connect it to your power station, and plug in your Starlink. It’s the perfect entry point for those new to solar energy solutions.
| Related: Starlink Power Consumption: What You Need to Know
Tier 2: The “Full-Time RV/Van Life” Setup (Robust & Reliable)
Use Case: Designed for continuous daily use while traveling. Handles Starlink standard with 6-10 hours of daily usage plus additional 12v devices.
Recommended Components:
- 300-400w roof-mounted solar panels
- 200-300ah lithium battery bank
- 40-60 amp MPPT charge controller
- 1000w pure sine wave inverter
- Battery monitoring system
Power Capability: Provides reliable power for extended periods, even during cloudy days. Supports high-speed internet, charging devices, LED lighting, and small appliances.
Estimated Investment: $2,000-$3,500
This tier offers the sweet spot between cost and capability for mobile applications. The system can handle variable weather conditions while providing enough power for comfortable modern living.
Tier 3: The “Off-Grid Homesteader” Setup (Maximum Power & Redundancy)
Use Case: A permanent, comprehensive solution for homes completely disconnected from the grid. Supports multiple Starlink dishes, full household connectivity, and integration with existing power systems.
Recommended Components:
- 800w+ solar array (expandable design)
- 400ah+ battery bank with battery backup redundancy
- High-capacity MPPT charge controller (60-100 amp)
- 2000w+ inverter system
- Generator backup integration
- Advanced monitoring and control systems
Power Capability: Handles all your connectivity needs plus substantial additional power for household appliances, workshops, and future expansion.
Estimated Investment: $4,000-$8,000+
This comprehensive setup provides complete energy independence with professional-grade reliability. It’s designed for long-term operation with minimal maintenance requirements.

Plug-and-Play vs. DIY: Which Path is Right for You?
The choice between pre-built solar generators and custom DIY systems depends on your budget, technical comfort level, and long-term goals.
The Simplicity of Solar Generators
Advantages:
- Immediate usability: Unbox, charge, and start using within minutes
- Integrated design: All components are pre-matched and tested together
- Portability: Built-in handles and compact designs for easy transport
- Safety: Factory-assembled with built-in protections
- Warranty support: Single-source warranty and customer service
Considerations:
- Higher cost per watt-hour of storage
- Limited expandability and customization options
- Proprietary components may limit future upgrades
- Less educational value about your power system
Top Recommendations:
- Jackery Explorer series: Excellent build quality with reliable performance
- EcoFlow Delta series: Fast charging and high power output capabilities
- Goal Zero Yeti line: Rugged construction with modular expansion options
The Power of a DIY Solar Setup
Advantages:
- Cost efficiency: 40-60% lower cost than equivalent portable generators
- Complete customization: Design exactly what you need
- Expandability: Add capacity as your needs grow
- Learning experience: Understand your system completely
- Quality components: Choose the best individual components for your needs
Considerations:
- Requires research and basic electrical knowledge
- More complex installation and troubleshooting
- Multiple warranty sources for different components
- Safety responsibility rests with the builder
Step-by-Step DIY Installation Guide
Planning Phase:
- Calculate your total daily energy needs
- Determine mounting locations for panels and components
- Plan your wiring routes and connections
- Gather all necessary tools and safety equipment
Installation Steps:
- Mount your solar panels in optimal sun-facing positions
- Install the charge controller in a ventilated, accessible location
- Connect your battery bank with proper fusing and monitoring
- Wire the inverter close to the batteries to minimize voltage drop
- Complete all DC connections before connecting solar panels
- Test each component individually before final system integration
Safety First: Always disconnect power sources when working on connections, use proper personal protective equipment, and consider having your completed system inspected by a qualified electrician.
Advanced Tips for Optimizing Your Solar-Powered Starlink
Maximizing your system’s efficiency requires understanding how to minimize power consumption while maintaining reliable connectivity.
Power-Saving Techniques
Starlink Power Management:
- Use “sleep scheduling” during off-hours to reduce idle power consumption
- Consider using a separate router instead of Starlink’s built-in Wi-Fi to reduce power draw by 5-10w
- Position your dish for optimal signal strength to minimize power-hungry searching behavior
- Keep the dish clean and free from obstructions
System Optimization:
- Install your batteries in temperature-controlled environments when possible
- Use low-power devices for secondary functions (LED lighting, fans, etc.)
- Implement smart switching to turn off unused circuits
- Monitor your power consumption patterns to identify inefficiencies
Long-Term Maintenance for Reliable Operation
Monthly Tasks:
- Clean solar panels to maintain maximum efficiency
- Check all connections for corrosion or looseness
- Monitor battery voltage and capacity trends
- Inspect mounting hardware for wear or damage
Seasonal Maintenance:
- Adjust panel angles for optimal seasonal sun angles
- Check and clean the charge controller ventilation
- Test your backup power systems
- Update system monitoring software and firmware
Annual Deep Maintenance:
- Professional electrical system inspection
- Battery capacity testing and replacement planning
- System expansion planning and component upgrades
- Documentation updates and warranty tracking
Cold Weather and Low-Light Performance
Winter Considerations: Solar panels actually perform more efficiently in cold temperatures, but reduced daylight hours and snow coverage can impact power generation. Plan for 50-70% reduced winter production in northern climates.
Cloudy Day Strategies:
- Size your battery bank to handle 2-3 days without solar input
- Consider a small generator as a backup for extended cloudy periods
- Use power conservation modes during low-generation periods
- Monitor weather forecasts to prepare for extended cloud cover
Future-Proofing Your Investment
Design your system with expansion in mind. Use oversized charge controllers and wiring to accommodate additional solar panels. Choose battery technologies that allow for easy capacity increases. Document your system thoroughly for future modifications and troubleshooting.
Is a Solar-Powered Starlink Worth It for You? A Decision-Making Framework
The decision to invest in solar-powered satellite internet involves weighing upfront costs against long-term benefits and your specific needs.
Cost-Benefit Analysis Framework
Calculate Your Break-Even Point:
- Traditional alternatives: Internet + generator fuel costs over time
- Solar system costs: Initial investment + maintenance expenses
- Additional benefits: Backup power for other devices, energy independence
- Intangible value: Connectivity in remote location, environmental impact
For most users in remote areas, the break-even point occurs within 2-3 years when compared to generator-based power solutions.
Alternative Power Solutions
While solar is the most practical renewable energy source for most locations, consider supplementary options:
Small wind turbines can provide power during cloudy periods if you have consistent wind resources. They work excellently as supplements to solar in windy locations.
Micro-hydro systems offer 24/7 power generation if you have access to flowing water. They’re particularly valuable for permanent off-grid installations near streams or rivers.
Backup generators bridge the gap during extended periods of poor renewable energy generation. Modern inverter generators can seamlessly integrate with solar systems.
Your Decision Checklist
Choose Solar-Powered Starlink If:
- ✓ You spend significant time in areas without reliable grid power
- ✓ You value energy independence and environmental sustainability
- ✓ Your location receives adequate sunlight for solar generation
- ✓ You need reliable backup power for critical connectivity
- ✓ Long-term cost savings matter more than upfront investment
Consider Alternatives If:
- ✗ You primarily use internet in grid-connected locations
- ✗ Your budget is extremely limited and you need immediate solutions
- ✗ Your location has very poor solar resources year-round
- ✗ You’re uncomfortable with basic electrical systems maintenance
Matching System Tiers to Your Situation
Go with Tier 1 if: You’re a casual user who needs occasional connectivity for camping, emergency backup, or weekend getaways. The simplicity and portability outweigh the higher per-watt costs.
Choose Tier 2 if: You’re living mobile (RV, van, boat) and need reliable daily internet access. This tier provides the best balance of cost, capability, and reliability for full-time travelers.
Invest in Tier 3 if: You’re establishing a permanent off-grid location or need professional-grade reliability. The higher upfront cost delivers long-term value and complete energy independence.
Conclusion: Your Journey to Energy Independence
Solar-powered Starlink represents more than just an internet solution—it’s your gateway to true location independence. Whether you’re pursuing the freedom of van life, building a sustainable homestead, or simply wanting reliable backup connectivity, combining SpaceX’s satellite internet with solar energy creates possibilities that were unimaginable just a few years ago.
Key Takeaways to Remember:
- Starlink can definitely be solar powered with the right system design
- Your power needs determine everything from component selection to budget requirements
- Both plug-and-play and DIY solutions offer valid paths to connectivity freedom
- Proper system sizing prevents frustrations and ensures reliable operation
- The investment pays dividends in independence, reliability, and peace of mind
The technology has matured to the point where solar-powered internet is not just possible—it’s practical, reliable, and increasingly affordable. You now have all the knowledge needed to make an informed decision about which approach best fits your needs, budget, and technical comfort level.
Your journey to energy independence starts with a single step. Whether that’s unfolding a portable solar panel for your first camping trip with Starlink mini or planning a comprehensive off-grid power system, you’re joining a growing community of people who refuse to let location limit their connectivity.
Ready to Get Started? Share your specific use case and questions in the comments below. I’d love to help you refine your system design and connect you with others who’ve successfully implemented similar setups. Together, we can build a community of truly connected, energy-independent individuals who’ve discovered the freedom that comes from combining the best of renewable energy with cutting-edge satellite internet technology.
What’s your solar-powered Starlink setup looking like? Drop a comment with your questions, experiences, or plans—I read and respond to every single one, and your insights help other readers on their journey to connectivity freedom.

