
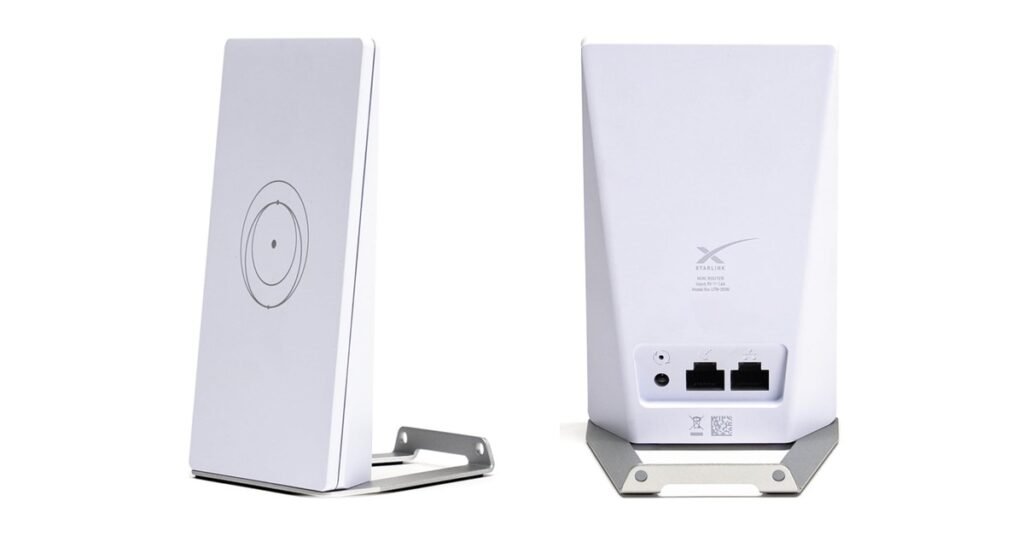
If your Starlink WiFi doesn’t reach every room, the Router Mini is the cheapest official fix. It’s Starlink’s own compact WiFi 6 mesh router. Plug it in, tap “Pair” in the Starlink app, and it extends your existing Starlink network by about 2,200 sq ft, per Starlink. It works with the Starlink Mini, Router 3 and Gen 2 Router (Starlink Help Center).
People searching for a “Starlink Mini router” usually mean one of two things: the router built into the Starlink Mini dish, or the separate Router Mini you can add to any recent Starlink. This page covers both, then explains why the Router Mini is worth adding, how to set it up, and where to buy it.
Key Takeaways
- The Starlink Mini already has a router built in (WiFi 5, up to 1,200 sq ft). You don’t need anything else to get online.
- The Router Mini is a separate WiFi 6 mesh router rated for about 2,200 sq ft. It extends WiFi from a Starlink Mini, Router 3 or Gen 2 Router. It doesn’t work with the Gen 1 Router.
- Setup takes minutes: plug it in, wait for “New Mesh Node” in the Starlink app, tap Pair. A wired connection gives the best speed.
- Indoors only. Starlink says not to place it outside.
- Price: $60 in Starlink’s own shop (you sign in to buy). It’s also on Amazon from third-party sellers, usually for more.

Price check (September 29, 2026): Starlink’s own shop lists the Router Mini at $60, shipping included; you need to sign in to your Starlink account to buy. The Amazon listing above is from a third-party seller (the brand shows as “Generic”) and was $139.99 when we checked. Amazon’s advantages: no Starlink login needed, it ships from Amazon, and it has Amazon’s 30-day returns. Compare both before you buy.
- Starlink Mini Router vs Router Mini: Two Different Things
- Why Add a Router Mini? 6 Good Reasons
- Router Mini Specifications
- Router Mini vs Router 3
- How to Set Up the Starlink Router Mini
- What the Router Mini Lights Mean
- Can You Use Your Own Router Instead?
- Pros and Cons
- Who Should Buy the Router Mini?
- Frequently Asked Questions
Starlink Mini Router vs Router Mini: Two Different Things
The Starlink Mini’s built-in router. The Mini dish has its WiFi router inside, so there’s no separate box to set up (Starlink Help Center). Per Starlink’s Mini spec sheet, it’s a WiFi 5 router covering up to 112 m² (1,200 sq ft) and up to 128 devices. That’s plenty for a van, a campsite or a small cabin.
The Router Mini. A separate, compact router Starlink sells as a mesh node: a helper router that joins your existing Starlink network and fills in weak spots (What is Starlink Mesh?). It’s WiFi 6, dual-band, and Starlink rates it at about 2,200 sq ft (204 m²). It’s flat and rectangular with a built-in kickstand, and its light sits on the front corner (Which Starlink router do I have?).
Starlink also bundles it: the Mini X kit is a Mini plus a Router Mini (Starlink Help Center), and the new Starlink V5 kit comes with a Router Mini as its router (V5 setup guide). For every kit side by side, see Starlink kits explained.
Why Add a Router Mini? 6 Good Reasons
- It fixes dead spots. One router rarely covers a whole house. Starlink recommends mesh routers for rooms where the main router’s signal is weak, placed one or two rooms apart (Starlink Help Center).
- It gives Starlink Mini owners WiFi 6 and more range indoors. The Mini’s built-in WiFi 5 covers up to 1,200 sq ft. Put a Router Mini inside, wired to the dish, and your devices connect to a WiFi 6 router rated for about 2,200 sq ft (Mini spec sheet; Starlink Help Center).
- It helps when the dish is outside and you’re inside. A Mini on an RV roof, a mast or a cabin wall has to push WiFi through walls, and metal bodies and thick walls weaken WiFi (Starlink WiFi tips). A Router Mini inside, on Starlink’s 15 m Mini Ethernet cable, puts the WiFi where you are (setup guide).
- It’s the cheapest official Starlink mesh node. It’s $60 in Starlink’s shop (Starlink shop), and it’s the router Starlink recommends for apartments, smaller homes and filling in dead spots (Starlink Help Center).
- It’s small and easy to place. It stands on a table with its kickstand or mounts on a wall. The stand, screws and drywall anchors come in the box.
- It works with the Starlink app. Your mesh nodes show up on the app’s Network screen, where you can see how each one is connected and move them if needed (How do I set up Starlink Mesh?).
Because it’s official Starlink hardware, you keep one network name and the Starlink app. A third-party mesh system usually means switching Starlink’s WiFi off with bypass mode, and Starlink says some app features may not work with third-party equipment (Starlink Help Center). For other options, see our guide to Starlink WiFi extenders and mesh systems.
Router Mini Specifications
Router Mini specifications (Starlink) |
|
|---|---|
| WiFi | WiFi 6 (802.11ax) |
| Bands | Dual-band, 2.4 GHz and 5 GHz |
| Antennas | 2×2 on 2.4 GHz, 2×3 on 5 GHz, MU-MIMO |
| Coverage | About 2,200 sq ft (204 m²) per router |
| Security | WPA2 |
| Operating temperature | -30°C to +50°C (-22°F to +122°F) |
| Use | Indoor only |
| Works with | Starlink Mini, Router 3, Gen 2 Router (not Gen 1) |
| In the box | Router, power supply, stand, 2 screws, 2 drywall anchors |
Specifications from Starlink’s router specifications and Starlink Mesh pages. Coverage depends on your layout, wall materials and interference. The box contents are from the Amazon listing’s photos and Starlink’s setup guide.
Router Mini vs Router 3
Both are WiFi 6 and both work as mesh nodes. Starlink positions them like this (Starlink Help Center):
| Router Mini | Router 3 | |
|---|---|---|
| Bands | Dual-band | Tri-band, dedicated backhaul |
| Coverage | About 2,200 sq ft | About 3,200 sq ft |
| Best for | Small and medium homes, dead spots | Large or busy homes |
| Performance | Basic to moderate | High, heavy use |
Pick the Router Mini to fill a weak room, cover an apartment or small home, or add WiFi 6 to a Starlink Mini. Pick the Router 3 for a big, multi-level house with lots of devices. Starlink notes the Router Mini may struggle through brick, stone or several walls; adding another node or using a wired connection helps. For older routers, see our Gen 3 vs Gen 2 router comparison.
How to Set Up the Starlink Router Mini
First make sure your Starlink is set up and online (new to Starlink? see our setup guide). Then, per Starlink’s Router Mini setup guide:
Wireless mesh (easiest)
- Plug the Router Mini into a power outlet, one or two rooms from your main Starlink router or Mini. Put it up off the floor, on a shelf or table.
- Stay connected to your normal Starlink WiFi and open the Starlink app.
- Wait 1–2 minutes for a “New Mesh Node(s)” notification.
- Tap Pair (or Pair All). The node connects on the Network screen in about 1–5 minutes.
Wired mesh (best performance)
- Plug an Ethernet cable into a LAN port on your main Starlink router (on the Router 3, remove the protective cover first).
- Plug the other end into the Router Mini’s WAN port, the one marked with the Starlink symbol.
- For a direct connection to a Starlink Mini, use Starlink’s 15 m Mini Starlink Ethernet Cable. It keeps the dish waterproof. For other Starlink routers, any Cat5e or better cable works.
Placement tips
- Keep nodes one to two rooms apart and pair each one directly to the main router. Chained nodes are slower (Starlink Help Center).
- Use no more than three mesh nodes; more can make performance worse.
- Avoid cement walls and metal appliances between routers, and keep it upright and in the open, not in a cabinet.
- Starlink recommends running cable to extra routers in homes over 6,000 sq ft.
- It needs an indoor power outlet. In a van or RV, plan for an AC outlet or inverter where you’ll put it.
If it won’t pair: don’t connect to the new node’s own “STARLINK” network; stay on your original one. Factory reset the node, move it closer to the main router, and update the app. You can also pair it with a short Ethernet cable, then unplug the cable once it’s connected (Starlink Mesh issues). If the main router itself drops out, see Starlink router unreachable.
What the Router Mini Lights Mean
- Flashing white: trying to connect. It turns red after 20 minutes without internet.
- Solid white: connected. It turns off after an hour.
- No light: no power, or connected with the light timed out.
- Red: not connected to the internet.
- Violet: bypass mode. It turns off after an hour; a factory reset is needed to leave bypass mode.
Source: What do the lights on my Router Mini mean?
Can You Use Your Own Router Instead?
Yes. With the Starlink Mini, connect your router through the Mini’s Ethernet port and turn on bypass mode in the app (Settings > Bypass Mode). Two catches from Starlink: with a standard RJ45 cable the Mini is no longer rated IP67, and leaving bypass mode needs a manual factory reset (Starlink Help Center; bypass mode). Starlink also says it can’t guarantee third-party routers will work with every app feature.
That’s why, for most people, the Router Mini is the simpler way to get more WiFi: no bypass mode, no second app, and it stays on your Starlink network.
Pros and Cons
Who Should Buy the Router Mini?
- Buy it if your Starlink WiFi is weak in some rooms, you want WiFi 6 from a Starlink Mini, your dish sits outside a van, RV or cabin while you work inside, or you have a Router 3 or Gen 2 and want a cheap extra node.
- Skip it if your current Starlink WiFi already covers your space, you still have a Gen 1 Router (it doesn’t support mesh), or you need WiFi outdoors.
Choosing between dishes rather than routers? See Starlink Standard vs Mini.
Frequently Asked Questions
Does the Starlink Mini have a built-in router?
Yes. The Mini has an integrated WiFi 5 router covering up to 1,200 sq ft and 128 devices, so a separate router isn’t required. Starlink suggests adding its routers as mesh nodes if you want more coverage.
Do I need a Router Mini with my Starlink Mini?
Only if the Mini’s own WiFi doesn’t reach where you use your devices. A Router Mini wired to the dish with Starlink’s Mini Ethernet cable brings WiFi 6 indoors and extends coverage.
Does the Router Mini work with Starlink Gen 3 and Gen 2?
Yes. It meshes with the Router 3 (Gen 3), the Gen 2 Router and the Starlink Mini. It doesn’t work with the Gen 1 Router.
Can I use the Router Mini outdoors?
No. Starlink configures it for indoor use and warns that placing it outside can cause connectivity problems.
How many Router Minis can I add?
Starlink recommends no more than three mesh nodes; more can reduce performance. Pair each one directly to the main router.
Does the Router Mini work with non-Starlink internet or other mesh systems?
Starlink documents it only as a mesh node for Starlink systems and says its mesh routers aren’t compatible with third-party mesh systems. Some Amazon listings claim it works with other internet providers, but Starlink doesn’t say so.
Which Starlink kits come with a Router Mini?
The Mini X (a Mini plus a Router Mini) and the Starlink V5 kit. Other kits don’t include one; you buy it separately.
How much is the Starlink Router Mini?
$60 including shipping in Starlink’s US shop as of September 2026. Third-party sellers on Amazon and elsewhere often charge more, so compare prices.
Facts from the Starlink Help Center, Starlink’s spec sheets and Starlink’s shop, checked September 29, 2026. Prices change. As an Amazon Associate we earn from qualifying purchases; see our disclaimer. Not affiliated with SpaceX or Starlink.

