
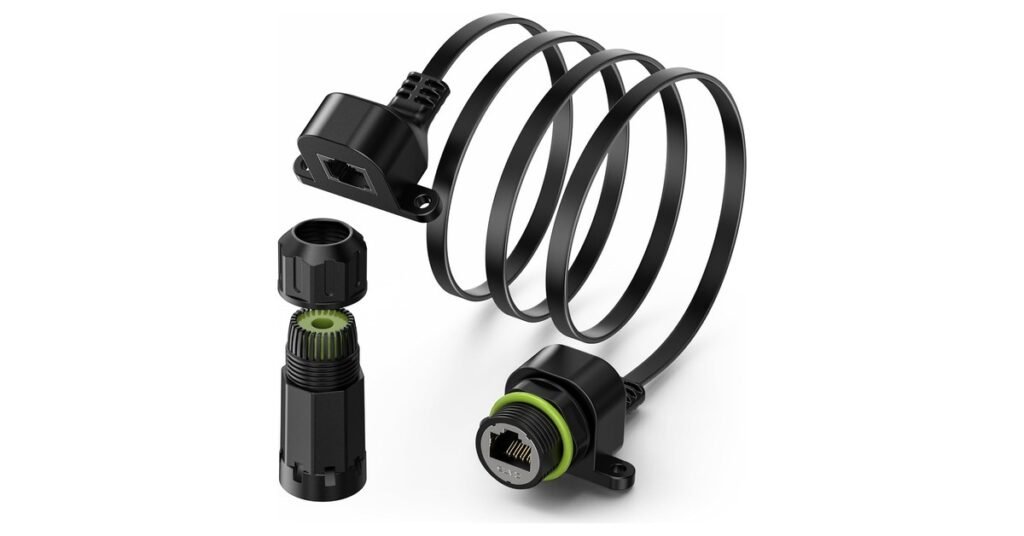
A Starlink cable pass through gets the cable from the dish outside to the router inside without leaving a window open or drilling through an exterior wall. The easiest kind is a Starlink cable window pass through: a short, flat ribbon cable that sits in the closed window or door frame, with a socket on each side. The WXPSKY pass-through below is 1.65 mm thin, has a waterproof outdoor connector, and needs no tools beyond a screwdriver.
This guide covers how a window pass-through works, what the WXPSKY includes, how to install it, which Starlink kits it suits, and when drilling through the wall is the better choice.
Key Takeaways
- What it does: carries the Starlink connection through a closed window or door, so the window shuts and the main cable isn’t crushed.
- No drilling: ideal for renters, RVs, boats and temporary setups.
- The WXPSKY pass-through: a 15.7 in (400 mm) flat CAT6 cable, 1.65 mm thick, with an IP68 waterproof connector outside. It’s rated 4.8 stars on Amazon.
- You need one more cable: both ends are sockets, so a short cable runs from the indoor socket to your router.
- Best fit: the Standard (Gen 3), Standard 4, 4 X and V5, which use an RJ45-style plug. It isn’t for the Gen 2 dish or the Mini’s power cable.

It was $47.99 on Amazon on October 1, 2026. The button shows the current price.
- What Is a Starlink Cable Pass Through?
- WXPSKY Starlink Window Cable Pass Through: What You Get
- What Else You Need: a Short Indoor Cable
- How to Install a Starlink Cable Window Pass Through
- Which Starlink Kits Does It Fit?
- Window Pass-Through vs Drilling Through the Wall
- Pros and Cons
- Who Should Buy It?
- Frequently Asked Questions
What Is a Starlink Cable Pass Through?
It’s any fitting that takes the Starlink cable through the building’s outer shell. There are two kinds:
- Window or door pass-through: a flat jumper cable thin enough for the window to close on it. Nothing is drilled, and you can take it with you when you move.
- Wall pass-through: a drilled hole through the exterior wall, sealed with grommets. It’s permanent and neater, but needs tools and permission. See our Starlink cable routing kit guide.
Why not just shut the window on the Starlink cable itself? The round cable is too thick, so the window stays ajar, and pinching it can damage it. Starlink warns that cable damage affects your service and says to keep the cable free of kinks and door jambs (Starlink Help Center). A flat pass-through takes the squeeze instead.
WXPSKY Starlink Window Cable Pass Through: What You Get
WXPSKY pass-through specifications (per the Amazon listing) |
|
|---|---|
| Flat section | 400 mm (15.7 in) long, 1.65 mm thick |
| Cable | CAT6, ultra-flat, 4 twisted pairs, copper |
| Speed rating | Up to 10 Gbps |
| Power rating | Up to 100 W (PoE++) |
| Outdoor end | RJ45 socket in an IP68 waterproof shell |
| Indoor end | RJ45 socket |
| Mounting | M3 screw holes; 4 screws and 2 adhesive mounts included |
| Jacket | Cold-resistant, flame-retardant PVC |
Why we like it:
- No holes in the wall. It suits rentals, RVs, travel trailers and boats, and anywhere a landlord or HOA won’t allow drilling. When you move, it comes with you.
- The window closes properly. At 1.65 mm, the flat section is thin enough to sit under a sash or in a door frame. WXPSKY shows it with sliding, hung, casement, awning and hopper windows.
- The outdoor joint is sealed. The outside socket sits in a screw-together IP68 shell with a gasket and sealing ring, so the connection isn’t left open to rain. One reviewer calls it sturdier than the bare ribbon jumpers sold for the same job.
- It stays put. Screw holes and adhesive mounts hold each end, so the weight of the cable doesn’t pull on the flat section.
- Buyers like it. It has 4.8 stars on Amazon, and recent reviewers describe using it in a house window and a travel-trailer door.
Worth knowing:
- Both ends are sockets. Your Starlink cable plugs in outside. Inside, you need a second cable from the socket to the router (see below).
- It adds a connection to the cable run. Starlink doesn’t recommend combining its cable with other cables and says problems caused that way may not be covered by the warranty. It’s a trade-off you accept for not drilling.
- The power rating is 100 W. The same cable powers the dish. Starlink lists the Standard 4 at 75–100 W on average, so it’s within WXPSKY’s rating but without much headroom. We wouldn’t use it with the higher-power Performance dishes. See Starlink power consumption.
- It’s a new listing. It has 27 ratings so far, and a few older reviews on the page are about a different product, so the track record is still short.
- The listing says “all Starlink models”. That’s too broad; see which kits it fits below.
What Else You Need: a Short Indoor Cable
Because the pass-through has a socket on each end, the connection runs: dish → Starlink cable → pass-through → short indoor cable → router. For the indoor piece, a short Starlink-style cable is the safest match, since it has the same plug as the original. The LUCMO cable comes in 6.5, 10, 16 and 30 ft lengths; see our Starlink long cable guide.
Place the router close to the window to keep the indoor run short, and make sure there’s a power outlet nearby.
How to Install a Starlink Cable Window Pass Through
- Unplug the Starlink before you change any cables.
- Pick the window or door nearest to where the router will sit. A window you rarely open is best.
- Lay the flat section across the sill or frame and close the window gently. Check that it shuts and locks.
- Fix both ends with the adhesive mounts or screws so they don’t hang from the flat cable.
- Outside: plug the Starlink cable into the outdoor socket and assemble the waterproof shell around it, following the included guide. Tighten it by hand.
- Leave a drip loop: let the cable dip below the connector before it rises to it, so rain runs off and not into the joint.
- Inside: run the short cable from the indoor socket to the router’s dish port.
- Power up and test. Check the Starlink app for alerts and run a speed test. If the dish doesn’t power up, reseat each plug until it clicks.
Tip: try it loose before you stick or screw anything down. If speeds drop or the dish won’t start, you’ll know before you’ve fixed it in place, and you can return it.
Which Starlink Kits Does It Fit?
- Standard (Gen 3), Standard 4, Standard 4 X and V5: yes. Their cable ends in an RJ45-style plug, which is what the pass-through’s sockets take.
- Standard Actuated (Gen 2): no. Its cable uses Starlink’s own plug shape, not RJ45.
- Starlink Mini: not for the power cable, which is a DC barrel plug. It can carry an Ethernet line from the Mini’s Ethernet port. See Starlink Mini accessories.
- Performance kits: we wouldn’t. They draw more power than the Standard dish, and the pass-through is rated to 100 W.
- After the router: it also works for any ordinary Ethernet run, such as a line to an outdoor camera or access point.
Not sure which kit you have? See Starlink kits explained.
Window Pass-Through vs Drilling Through the Wall
| Window pass-through | Wall hole | |
|---|---|---|
| Drilling | None | Yes |
| Best for | Renters, RVs, boats | Owned homes |
| Removable | Yes | No |
| Extra joint in the cable | Yes | No |
| Extra cable needed | Short indoor cable | None |
| Typical cost | About $48 | About $27 for a kit |
Choose the window pass-through if you can’t or don’t want to drill, or the setup is seasonal. Choose a wall hole for a permanent home install: the original cable runs unbroken from dish to router. Our cable routing kit guide covers that route, and how to set up Starlink covers the rest of the install.
Pros and Cons
Who Should Buy It?
- Buy it if you rent, travel with your Starlink, live on a boat or in an RV, or want the dish outside this weekend without touching the wall.
- Skip it if you own the house and want a permanent install (drill once and use a routing kit), or you have a Gen 2 dish or a Performance kit.
Frequently Asked Questions
Can I run a Starlink cable through a window?
Yes, but don’t close the window on the round Starlink cable itself; pinching can damage it. Use a flat window pass-through, which is thin enough for the window to shut on.
What is a Starlink cable window pass through?
A short, flat Ethernet jumper with a socket on each end. The Starlink cable plugs in outside, the flat part sits in the closed window, and a second cable continues to the router inside.
Do I need to drill to get the Starlink cable inside?
No. A window or door pass-through needs no drilling. Drilling through the wall is the permanent alternative.
Is a window pass-through waterproof?
The WXPSKY’s outdoor connector sits in an IP68-rated shell, per the seller. The indoor end isn’t sealed and should stay inside. Add a drip loop outside.
Will a pass-through slow down my Starlink?
It shouldn’t: the WXPSKY is rated for 10 Gbps, far above Starlink speeds. Any extra joint is a possible weak point, though, so run a speed test after installing.
Does it work with the Starlink Mini?
Not for the Mini’s DC power cable, which isn’t RJ45. It can pass an Ethernet line from the Mini’s Ethernet port.
Will my window still close and lock?
The flat section is 1.65 mm thick, and WXPSKY says it fits standard window and door frames. Check that yours shuts and locks before you fix the ends down.
Can I use it in an RV or boat?
Yes. Reviewers describe using it through a travel-trailer door, and WXPSKY shows it in a boat window. It avoids drilling the hull or body.
Product details, ratings and price are from the WXPSKY Amazon listing, checked October 1, 2026; speed, power and waterproof ratings are the seller’s. We haven’t tested this product ourselves. As an Amazon Associate we earn from qualifying purchases; see our disclaimer. Not affiliated with SpaceX or Starlink.

